Summary: This training will guide you through the process necessary to add documents, videos, links and other resource materials into the “Media Center” of the customer’s Team Office. You will also learn how to set up “Categories” under which you can place your communications (Files).
Log into WorldVu Dashboard
- Click on CMS > Resource Center > Manage Categories
Modifying a Resource Center Category
- Click on a category from the list found on the “Manage Categories” page
- Change the “Title” and “Description” and the “Parent Category” if necessary
- Click “Save Item”
Note: These categories will be the “folders” in which you can organize your different files used in the “Media Center” under the “Resources” tab of the customer’s Team Office.
[imageframe lightbox=”no” lightbox_image=”” style_type=”none” hover_type=”none” bordercolor=”” bordersize=”0px” borderradius=”0″ stylecolor=”” align=”none” link=”” linktarget=”_self” animation_type=”0″ animation_direction=”down” animation_speed=”0.1″ animation_offset=”” hide_on_mobile=”no” class=”” id=””]  [/imageframe][separator style_type=”single” top_margin=”50″ bottom_margin=”50″ sep_color=”” border_size=”” icon=”” icon_circle=”” icon_circle_color=”” width=”” alignment=”center” class=”” id=””][imageframe lightbox=”no” lightbox_image=”” style_type=”none” hover_type=”none” bordercolor=”” bordersize=”0px” borderradius=”0″ stylecolor=”” align=”none” link=”” linktarget=”_self” animation_type=”0″ animation_direction=”down” animation_speed=”0.1″ animation_offset=”” hide_on_mobile=”no” class=”” id=””]
  [/imageframe]
Add a New Resource Center Category
- Click the “Add New Category” button
- Add the “Title” and “Description” as well as the “Parent Category” if appropriate
- Click “Save Item”
[imageframe lightbox=”no” lightbox_image=”” style_type=”none” hover_type=”none” bordercolor=”” bordersize=”0px” borderradius=”0″ stylecolor=”” align=”none” link=”” linktarget=”_self” animation_type=”0″ animation_direction=”down” animation_speed=”0.1″ animation_offset=”” hide_on_mobile=”no” class=”” id=””]  [/imageframe]
Modifying Resource Center Files
- Click on the “File” from the list of the “Manage Files” page
- Modify the appropriate fields
- Click “Save File”
- Verify your changes by logging into a customer’s Team Office and reviewing the “Media Center”
[imageframe lightbox=”no” lightbox_image=”” style_type=”none” hover_type=”none” bordercolor=”” bordersize=”0px” borderradius=”0″ stylecolor=”” align=”none” link=”” linktarget=”_self” animation_type=”0″ animation_direction=”down” animation_speed=”0.1″ animation_offset=”” hide_on_mobile=”no” class=”” id=””]  [/imageframe][separator style_type=”single” top_margin=”50″ bottom_margin=”50″ sep_color=”” border_size=”” icon=”” icon_circle=”” icon_circle_color=”” width=”” alignment=”center” class=”” id=””][imageframe lightbox=”no” lightbox_image=”” style_type=”none” hover_type=”none” bordercolor=”” bordersize=”0px” borderradius=”0″ stylecolor=”” align=”none” link=”” linktarget=”_self” animation_type=”0″ animation_direction=”down” animation_speed=”0.1″ animation_offset=”” hide_on_mobile=”no” class=”” id=””]
  [/imageframe][separator style_type=”single” top_margin=”50″ bottom_margin=”50″ sep_color=”” border_size=”” icon=”” icon_circle=”” icon_circle_color=”” width=”” alignment=”center” class=”” id=””][imageframe lightbox=”no” lightbox_image=”” style_type=”none” hover_type=”none” bordercolor=”” bordersize=”0px” borderradius=”0″ stylecolor=”” align=”none” link=”” linktarget=”_self” animation_type=”0″ animation_direction=”down” animation_speed=”0.1″ animation_offset=”” hide_on_mobile=”no” class=”” id=””]
  [/imageframe]
Adding Resource Center Files
- Click on “Add New File” on the “Manage Files” page
- Fill out the appropriate fields on the “Add File” page
- Media Type–Choose the appropriate file type
- Add/Update File–Upload the file to be displayed
- Description–Add information to identify the file
- Parent Category–Chose the category where the file will be located
- Start Date–The default will be today’s date but you may change this as appropriate for future release dates
- End Date–The default is no date but you may add one if the file should expire
- Customer Groups–Allows the customer type access to view the file in their “Media Center” in Team Office
- Minimum Rank–You may filter the view of the media files further for Associates/Distributors by rank (This may only be available if your are using the Xennsoft Compensation Plan Generator)
- # Times Viewed–You may set the number of times the file can be viewed
- Click “Save File”
- Verify your new file/changes by logging into a customer’s Team Office and reviewing the “Media Center”
[imageframe lightbox=”no” lightbox_image=”” style_type=”none” hover_type=”none” bordercolor=”” bordersize=”0px” borderradius=”0″ stylecolor=”” align=”none” link=”” linktarget=”_self” animation_type=”0″ animation_direction=”down” animation_speed=”0.1″ animation_offset=”” hide_on_mobile=”no” class=”” id=””] 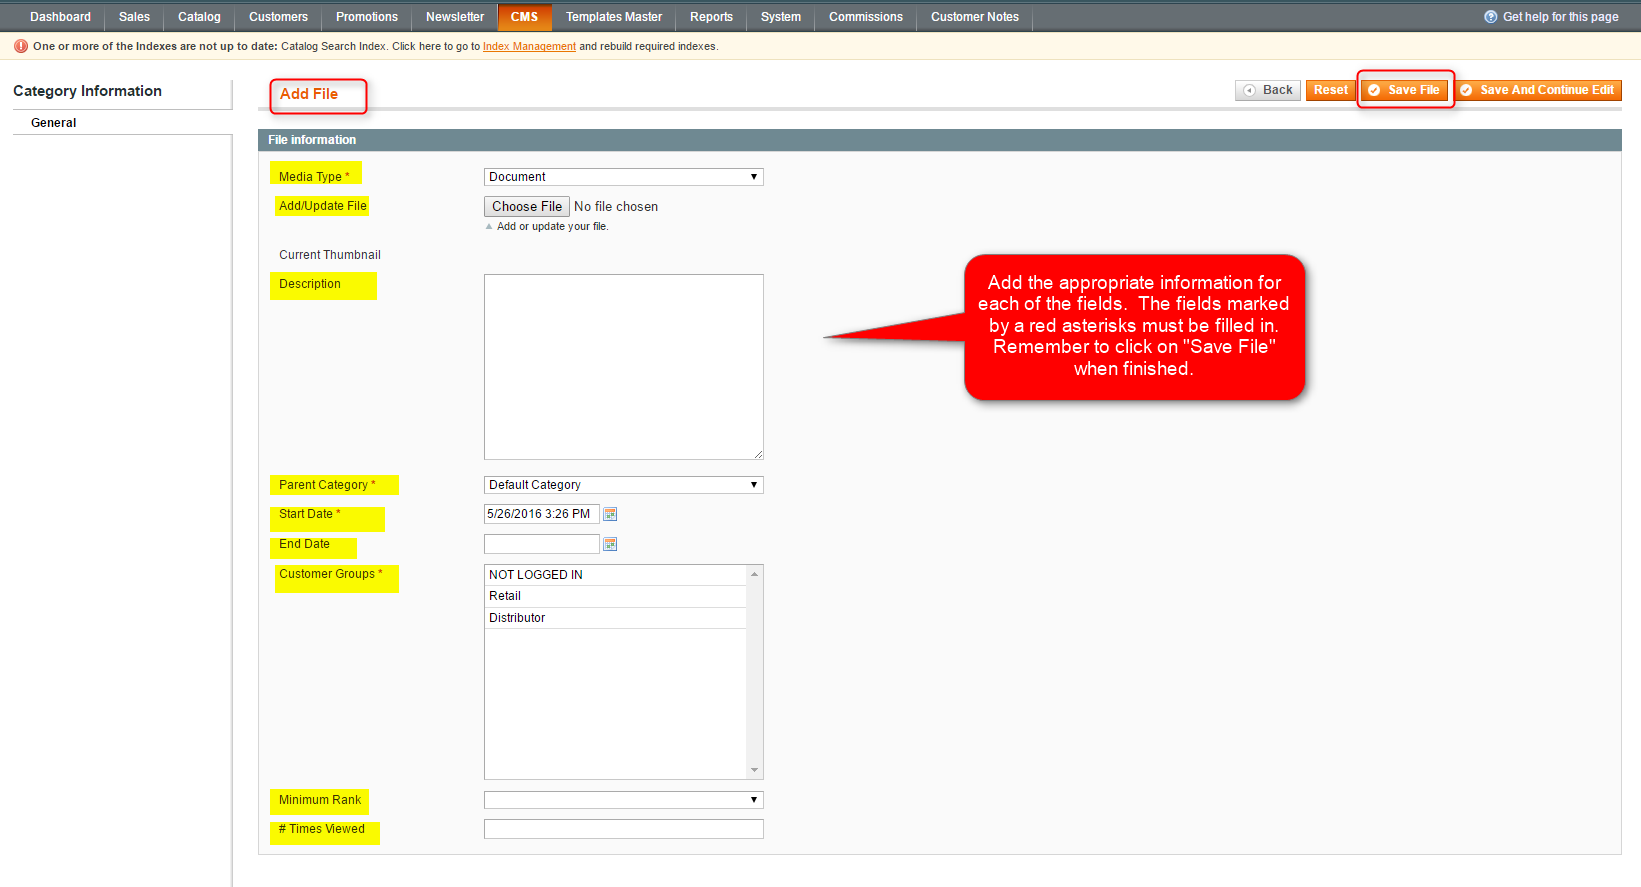 [/imageframe]
We hope this helps. Check out our other training posts for additional assistance.