Summary: This training will guide you through the process necessary to establish the corporate settings that will govern the Autoship shipping frequency and credit card invoice attempts. The training will show you where you may run reports that will identify different Autoship status types allowing you to fix possible issues associated with autoships that will not process. You will also gain an understanding of how the customer and Distributor/Associate views the Autoship set up process in their Team Office.
Log Into WorldVu Dashboard
- Sales > Autoship Profiles (part 1)
- Sales > Autoship Frequency Settings (part 2)
Establishing Corporate (WorldVu) Setting for Autoship (Part 1)
- On the “Autoship Profiles” page, Chose the “Status” you wish to filter the existing Autoships.
- Normal–These Autoships will process when their “Next Ship Date” is reached. You do not need to do anything further with these Autoships.
- Pay Fail–These Autoships will not process due to payment failure. The system will attempt to invoice them again the next Autoship release date which will be a week or month from the failed ship date. These Autoships may be exported to Customer Service for follow up with each customer to let them know there was a problem and to assist them in processing a new payment.
- Pay Fail Pending–These Autoships have not finished their cycle of payment processing attempts which are governed in the “Autoship Frequency Settings”. Once they have completed all the attempts they will change to the status of “Pay Fail” or “Normal” depending on successful completion of payment processing.
- New Pending–These Autoships have not been completed either in WorldVu or Team Office and cannot process until all the set up procedures are completed. These may be exported to Customer Service for follow up with each customer as a proactive step to verify if the customer needs assistance.
- Config Pending Fail–These are status’ not identified at the time of this training.
- Config Fail–These are status’ not identified at the time of this training.
- Once you have the filtered list you want, you may export it as an “CSV” or “Excel” file for use by other Departments.
[imageframe lightbox=”no” lightbox_image=”” style_type=”none” hover_type=”none” bordercolor=”” bordersize=”0px” borderradius=”0″ stylecolor=”” align=”none” link=”” linktarget=”_self” animation_type=”0″ animation_direction=”down” animation_speed=”0.1″ animation_offset=”” hide_on_mobile=”no” class=”” id=””]  [/imageframe]
Setting Up the Autoship Frequencies (Part 2)
- On the “Autoship Frequency Settings” page, establish the “Default Frequencies”. These settings will apply if no other rules are established for individual customer groups.
Note: You can create a “Frequency Type” of a week or a month. You can only set “Frequency” between 1-12 regardless of whether you are using weeks or months. The “Begin Date” can be set to any number however the common number would be “0” which would mean that the Autoship is set to immediately release when it is created. The other common setting would be a number allowing an estimated month’s time providing enough separation between an initial enrollment order and the Autoship order release date.
- Establish the “Customer Group Frequencies”. These settings are optional and can be created when you “Add Rule” that will apply to individual customer groups. These rules are established when you wish to provide the customer options when they create their Autoships. “Customer Group Frequencies” do not override the “Default Settings” established however they will allow customers to choose different scenarios for Autoshipments. If the customer does not choose any options then the defaults will apply.
Note: The “Frequency” can be created to have multiple options by holding the “Ctrl” key and clicking on all numbers (frequencies) that apply.
[imageframe lightbox=”no” lightbox_image=”” style_type=”none” hover_type=”none” bordercolor=”” bordersize=”0px” borderradius=”0″ stylecolor=”” align=”none” link=”” linktarget=”_self” animation_type=”0″ animation_direction=”down” animation_speed=”0.1″ animation_offset=”” hide_on_mobile=”no” class=”” id=””]  [/imageframe]
Establishing System Configuration Autoship Settings
- Go to System > Autoship Settings
- Click on “Module Options”
- Set your “Retry Process Orders” to the number you wish the system to attempt to invoice the customer’s credit card when payment fails. CAUTION: Do not set this number too high as it could create potential issues with your customer and payment processor. The attempts will be daily until retry attempts are complete.
- Set the “Allow Grace Period” to yes or no. When the grace period is set to “Yes” then the system will allow the customer the minimal retry attempts listed in the “Retry Process Orders” field and if one of the attempts is successful then the Autoship will be counted towards the weekly or monthly commission period. For example: If my Autoship is scheduled to run on the 30th of the month and has (3) attempts to process and my order is successfully processed on the third attempt or the 2nd day of the new commission period the commission credit will be applied to the prior commission period. CAUTION: The WorldVu Admin in charge of closing commission periods will need to know these settings and make sure they never close a weekly or monthly commission period until the grace period has expired.
- Click on “Autoship Email Settings”
- Set “Enabled” to “Yes”
- Choose the default “Email Sender” which is established elsewhere in System Configuration. This is the identity of the person who is sending the email notifications concerning the customer’s Autoship status.
- You may choose to have a copy of the email sent to “Send Email To”. This will provide a copy of all autoship emails sent to customers and send them to an internal corporate recipient.
- Choose the default template or template you have created for the next (6) Autoship notification fields.
- Click on “Save Config”
[imageframe lightbox=”no” lightbox_image=”” style_type=”none” hover_type=”none” bordercolor=”” bordersize=”0px” borderradius=”0″ stylecolor=”” align=”none” link=”” linktarget=”_self” animation_type=”0″ animation_direction=”down” animation_speed=”0.1″ animation_offset=”” hide_on_mobile=”no” class=”” id=””]  [/imageframe]
Understanding Customer’s Autoship Set Up
- When a customer initially clicks on the “Autoship” feature in their Team Office menu they will see a list of current Autoship profiles they have created (Most customers will only have (1) Autoship Profile). They will also see the status of each Autoship or if they do not have an Autoship, they will see a message stating they do not have a profile along with an invitation to “Add New Profile”
- If a customer has an Autoship profile they can edit it at any time by clicking on the Profile Name or on the edit feature which looks like a pencil. They may also delete the profile entirely by clicking on the (X) located next to the edit feature.
- When editing the Autoship profile, the customer may change the quantity of each product, they may add or delete current products from their profile, they may update the frequency if available, they may change or update a shipping address for this profile, change the shipping method if available and update, change or add a backup payment method applied to this profile.
- Once they are finished updating their Autoship profile information they will need to click on the “Review” and after verifying the information must click on “Save Autoship”. If they miss this step, their changes will not be saved.
[imageframe lightbox=”no” lightbox_image=”” style_type=”none” hover_type=”none” bordercolor=”” bordersize=”0px” borderradius=”0″ stylecolor=”” align=”none” link=”” linktarget=”_self” animation_type=”0″ animation_direction=”down” animation_speed=”0.1″ animation_offset=”” hide_on_mobile=”no” class=”” id=””] 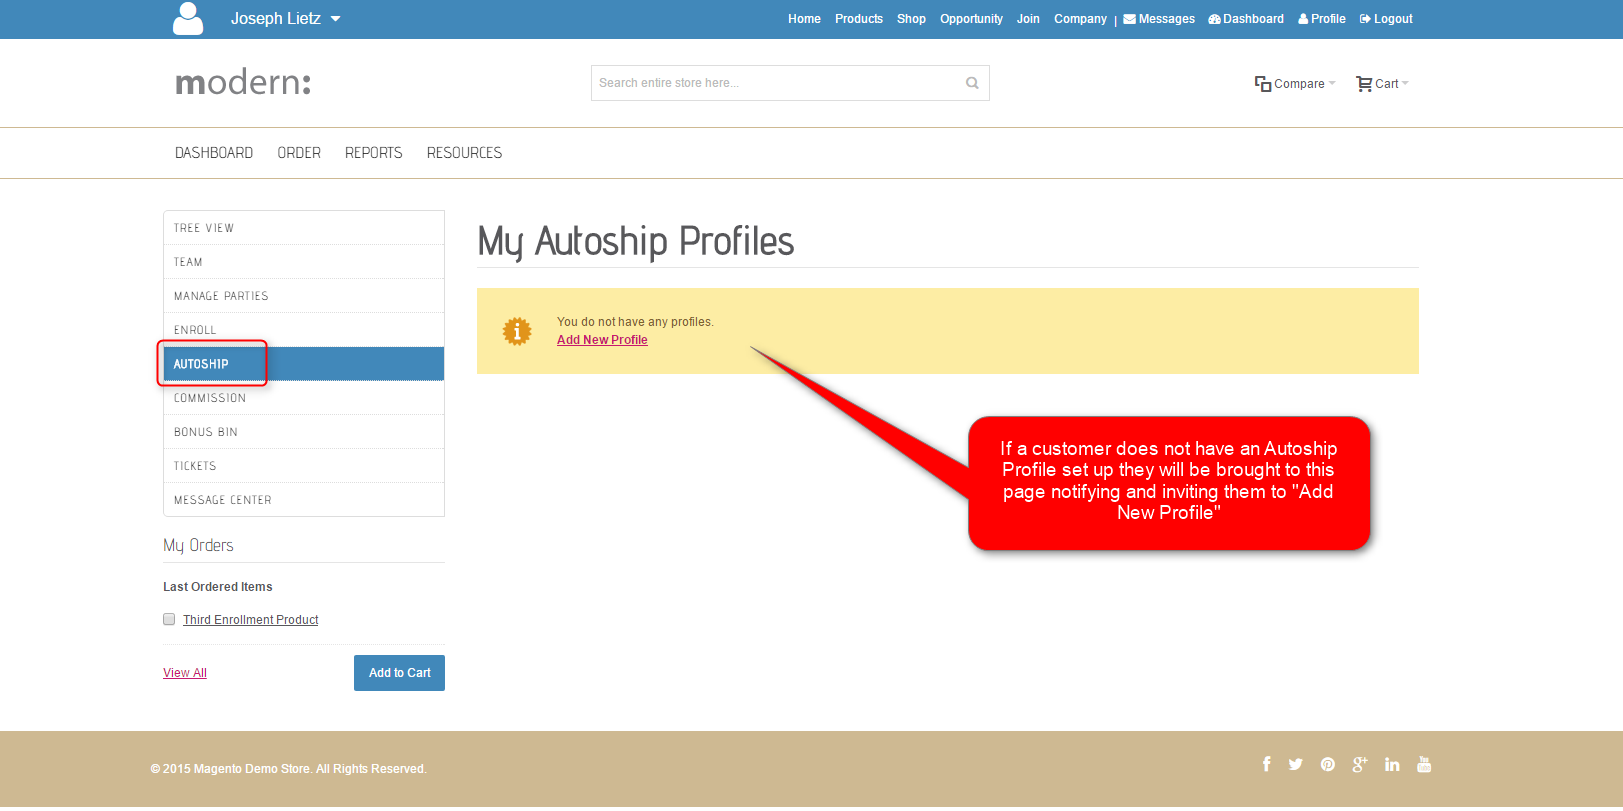 [/imageframe][separator style_type=”single” top_margin=”50″ bottom_margin=”50″ sep_color=”” border_size=”” icon=”” icon_circle=”” icon_circle_color=”” width=”” alignment=”center” class=”” id=””][imageframe lightbox=”no” lightbox_image=”” style_type=”none” hover_type=”none” bordercolor=”” bordersize=”0px” borderradius=”0″ stylecolor=”” align=”none” link=”” linktarget=”_self” animation_type=”0″ animation_direction=”down” animation_speed=”0.1″ animation_offset=”” hide_on_mobile=”no” class=”” id=””]
  [/imageframe][separator style_type=”single” top_margin=”50″ bottom_margin=”50″ sep_color=”” border_size=”” icon=”” icon_circle=”” icon_circle_color=”” width=”” alignment=”center” class=”” id=””][imageframe lightbox=”no” lightbox_image=”” style_type=”none” hover_type=”none” bordercolor=”” bordersize=”0px” borderradius=”0″ stylecolor=”” align=”none” link=”” linktarget=”_self” animation_type=”0″ animation_direction=”down” animation_speed=”0.1″ animation_offset=”” hide_on_mobile=”no” class=”” id=””]
  [/imageframe]
We hope this helps. Check out our other training posts for additional assistance.