[one_full last=”yes” spacing=”yes” center_content=”no” hide_on_mobile=”no” background_color=”” background_image=”” background_repeat=”no-repeat” background_position=”left top” hover_type=”none” link=”” border_position=”all” border_size=”0px” border_color=”” border_style=”” padding=”” margin_top=”” margin_bottom=”” animation_type=”” animation_direction=”” animation_speed=”0.1″ animation_offset=”” class=”” id=””]
Summary: This training will guide you through the process needed to set up your own In-house shipping process of orders and introduce you to upgrade solutions when growth reaches levels warranting assistance.
Step 1: WorldVu Dashboard
Log into WorldVu Dashboard
Step 2: Identify Orders
Click on Sales Tab > Orders
[separator style_type=”none” top_margin=”” bottom_margin=”” sep_color=”” border_size=”” icon=”” icon_circle=”” icon_circle_color=”” width=”” alignment=”” class=”” id=””][imageframe lightbox=”no” lightbox_image=”” style_type=”none” hover_type=”none” bordercolor=”” bordersize=”0px” borderradius=”0″ stylecolor=”” align=”none” link=”” linktarget=”_self” animation_type=”0″ animation_direction=”down” animation_speed=”0.1″ animation_offset=”” hide_on_mobile=”no” class=”” id=””]  [/imageframe][separator style_type=”none” top_margin=”” bottom_margin=”” sep_color=”” border_size=”” icon=”” icon_circle=”” icon_circle_color=”” width=”” alignment=”” class=”” id=””]
Step 3: Preparing Orders for Shipment
Prepare orders for shipment. There are several ways this may be done but in this training we will provide a list of options and some suggestions to help you as you start out.
A) It will help if you create a schedule (hourly/daily/weekly) in which you will fulfill the orders.
B) Begin by printing the “Order File” which will be used to track orders fulfilled and will help track orders you will mark shipped confirmed in the system.
- Set the drop down menu “Status” to “Processing”
- Click the “Search” button
- Click on “Export” then save/print the file that is created.
[separator style_type=”none” top_margin=”” bottom_margin=”” sep_color=”” border_size=”” icon=”” icon_circle=”” icon_circle_color=”” width=”” alignment=”” class=”” id=””][imageframe lightbox=”no” lightbox_image=”” style_type=”none” hover_type=”none” bordercolor=”” bordersize=”0px” borderradius=”0″ stylecolor=”” align=”none” link=”” linktarget=”_self” animation_type=”0″ animation_direction=”down” animation_speed=”0.1″ animation_offset=”” hide_on_mobile=”no” class=”” id=””] 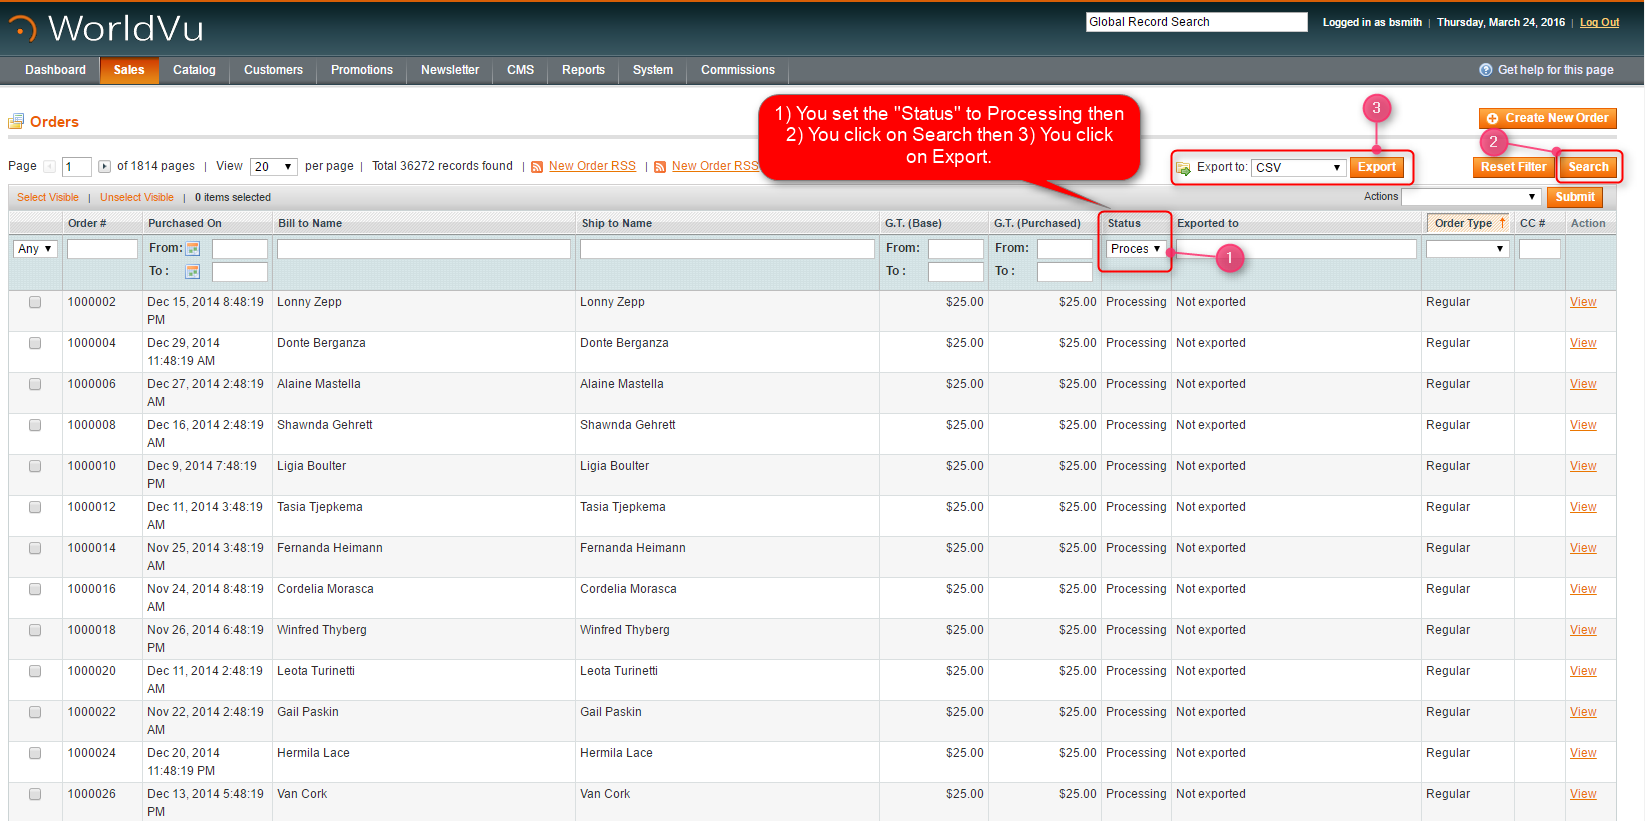 [/imageframe][separator style_type=”none” top_margin=”” bottom_margin=”” sep_color=”” border_size=”” icon=”” icon_circle=”” icon_circle_color=”” width=”” alignment=”” class=”” id=””]
C) After creating your order file, make sure the “Orders” page is set up in the following manner.
- “Status is set to “Processing”
- Click on the “Search” button to be sure you have all the orders
- Make sure the 1st column is set to “Any” and click on “Select Visible” which will mark all the “Processing” orders with a check mark.
- Select from the drop down menu located in the “Actions” box and choose the “Print Invoices” option.
Note: The system by default will not allow printing of “Packslips” until an order is marked “Shipped”. This is the reason we have chosen the option of using the “Invoice” print instead of the “Packslip” printing however there may be alternatives to this arrangement.
- Click “Submit” to create a file that you may save and print containing all the invoices related to the orders needing fulfillment.
[separator style_type=”none” top_margin=”” bottom_margin=”” sep_color=”” border_size=”” icon=”” icon_circle=”” icon_circle_color=”” width=”” alignment=”” class=”” id=””][imageframe lightbox=”no” lightbox_image=”” style_type=”none” hover_type=”none” bordercolor=”” bordersize=”0px” borderradius=”0″ stylecolor=”” align=”none” link=”” linktarget=”_self” animation_type=”0″ animation_direction=”down” animation_speed=”0.1″ animation_offset=”” hide_on_mobile=”no” class=”” id=””]  [/imageframe][separator style_type=”none” top_margin=”” bottom_margin=”” sep_color=”” border_size=”” icon=”” icon_circle=”” icon_circle_color=”” width=”” alignment=”” class=”” id=””]
Step 4: Fulfilling Orders Using the “Invoice” Printouts and the Exported Order File.
- Once the order has been fulfilled and you are ready to add the “Invoice” printout to the box. Make sure to write or stamp the printout with “Paid” to avoid confusion for the customer who might think the “Invoice” is a request for payment.
- Using the order file you exported earlier, mark the appropriate order line as “Shipped” and add the tracking number, if desired so it can be added later when you go back to WorldVu to ship confirm the orders in Step 5.
Note: To fulfill the orders you will need a third party system such as Stamps.com/Shippingeasy.com/WorldShip. These systems will allow you to print labels and add carrier rates (USPS, UPS, FedEx, etc.–accounts you established). You will also need a label printer.
[separator style_type=”none” top_margin=”” bottom_margin=”” sep_color=”” border_size=”” icon=”” icon_circle=”” icon_circle_color=”” width=”” alignment=”” class=”” id=””][imageframe lightbox=”no” lightbox_image=”” style_type=”none” hover_type=”none” bordercolor=”” bordersize=”0px” borderradius=”0″ stylecolor=”” align=”none” link=”” linktarget=”_self” animation_type=”0″ animation_direction=”down” animation_speed=”0.1″ animation_offset=”” hide_on_mobile=”no” class=”” id=””]  [/imageframe][separator style_type=”single” top_margin=”50″ bottom_margin=”50″ sep_color=”” border_size=”” icon=”” icon_circle=”” icon_circle_color=”” width=”” alignment=”center” class=”” id=””][imageframe lightbox=”no” lightbox_image=”” style_type=”none” hover_type=”none” bordercolor=”” bordersize=”0px” borderradius=”0″ stylecolor=”” align=”none” link=”” linktarget=”_self” animation_type=”0″ animation_direction=”down” animation_speed=”0.1″ animation_offset=”” hide_on_mobile=”no” class=”” id=””]
  [/imageframe][separator style_type=”none” top_margin=”” bottom_margin=”” sep_color=”” border_size=”” icon=”” icon_circle=”” icon_circle_color=”” width=”” alignment=”” class=”” id=””]
Step 5: “Ship Confirm” the Order
- Use the updated order file which now should contain the tracking numbers (if you chose to include them) and which show all the orders as fulfilled/shipped, you are ready to “Ship Confirm” the orders in WorldVu.
- Search for the order you wish to “Ship Confirm”. This may be done by adding the order # then clicking “Search” or if your list of orders is small, you may wish to bring up all orders by changing the “Status” column to “Processing” and clicking “Search”. This will bring up all orders. Click on the order containing the order # you wish to “Ship Confirm”.
- Clicking on an order will bring you to the “Order” page.
[separator style_type=”none” top_margin=”” bottom_margin=”” sep_color=”” border_size=”” icon=”” icon_circle=”” icon_circle_color=”” width=”” alignment=”” class=”” id=””][imageframe lightbox=”no” lightbox_image=”” style_type=”none” hover_type=”none” bordercolor=”” bordersize=”0px” borderradius=”0″ stylecolor=”” align=”none” link=”” linktarget=”_self” animation_type=”0″ animation_direction=”down” animation_speed=”0.1″ animation_offset=”” hide_on_mobile=”no” class=”” id=””]  [/imageframe][separator style_type=”none” top_margin=”” bottom_margin=”” sep_color=”” border_size=”” icon=”” icon_circle=”” icon_circle_color=”” width=”” alignment=”” class=”” id=””]
- On the “Order” page, click “Ship”.
[separator style_type=”none” top_margin=”” bottom_margin=”” sep_color=”” border_size=”” icon=”” icon_circle=”” icon_circle_color=”” width=”” alignment=”” class=”” id=””][imageframe lightbox=”no” lightbox_image=”” style_type=”none” hover_type=”none” bordercolor=”” bordersize=”0px” borderradius=”0″ stylecolor=”” align=”none” link=”” linktarget=”_self” animation_type=”0″ animation_direction=”down” animation_speed=”0.1″ animation_offset=”” hide_on_mobile=”no” class=”” id=””]  [/imageframe][separator style_type=”none” top_margin=”” bottom_margin=”” sep_color=”” border_size=”” icon=”” icon_circle=”” icon_circle_color=”” width=”” alignment=”” class=”” id=””]
- Once you are on the “New Shipment for Order” page which we have referred to as the “Ship Confirm” area, you will now be able to add the tracking number for the order by clicking on the “Add Tracking Number” button.
- Choose the appropriate carrier listed in the drop down menu.
- Add the tracking number.
- You may add a title to this action but it is unnecessary
- Add comments concerning the order/shipment.
Note: These comments can be sent to the customer if the “Append Comments” box is checked. The shipment information may be emailed by clicking the “Email Copy of Shipment” box. You may choose to mark both boxes sending the comments with the shipment information.
- Click “Submit Shipment” to confirm the shipment in the system.
[separator style_type=”none” top_margin=”” bottom_margin=”” sep_color=”” border_size=”” icon=”” icon_circle=”” icon_circle_color=”” width=”” alignment=”” class=”” id=””][imageframe lightbox=”no” lightbox_image=”” style_type=”none” hover_type=”none” bordercolor=”” bordersize=”0px” borderradius=”0″ stylecolor=”” align=”none” link=”” linktarget=”_self” animation_type=”0″ animation_direction=”down” animation_speed=”0.1″ animation_offset=”” hide_on_mobile=”no” class=”” id=””] 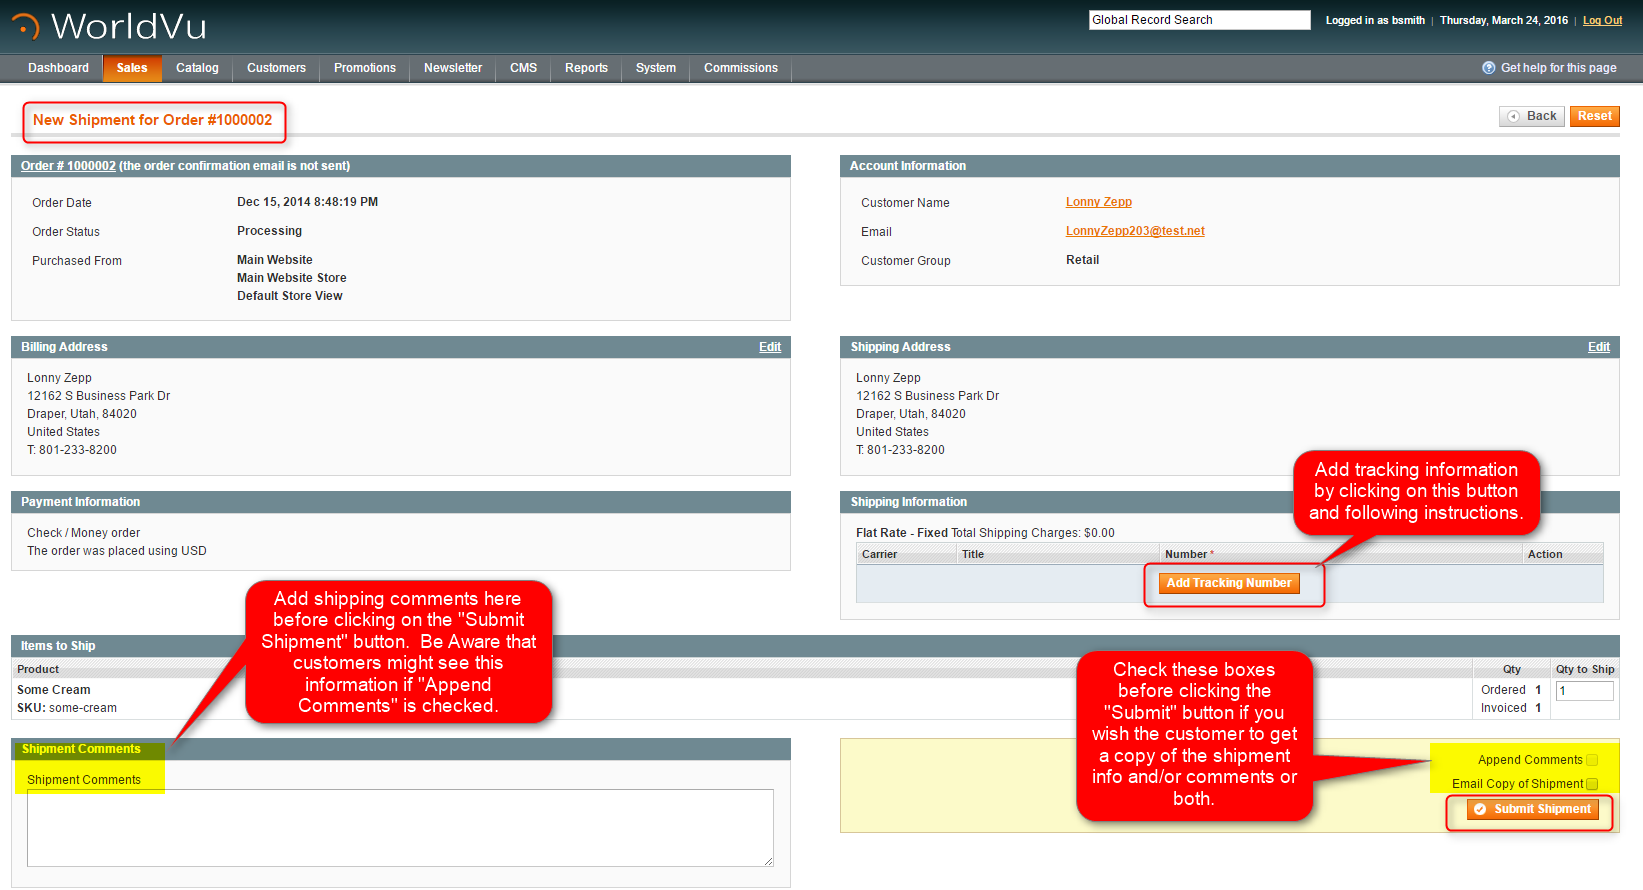 [/imageframe][separator style_type=”single” top_margin=”50″ bottom_margin=”50″ sep_color=”” border_size=”” icon=”” icon_circle=”” icon_circle_color=”” width=”” alignment=”center” class=”” id=””][imageframe lightbox=”no” lightbox_image=”” style_type=”none” hover_type=”none” bordercolor=”” bordersize=”0px” borderradius=”0″ stylecolor=”” align=”none” link=”” linktarget=”_self” animation_type=”0″ animation_direction=”down” animation_speed=”0.1″ animation_offset=”” hide_on_mobile=”no” class=”” id=””]
 ![]() [/imageframe][separator style_type=”none” top_margin=”” bottom_margin=”” sep_color=”” border_size=”” icon=”” icon_circle=”” icon_circle_color=”” width=”” alignment=”” class=”” id=””]
[/imageframe][separator style_type=”none” top_margin=”” bottom_margin=”” sep_color=”” border_size=”” icon=”” icon_circle=”” icon_circle_color=”” width=”” alignment=”” class=”” id=””]
- When you complete the “Ship Confirm” process after clicking the “Submit Shipment” button you will see a page showing a green line with “The Shipment has been Created”. You will also see the “Status” as “Complete” in the “Comments History”. Repeat this process until all the orders you fulfilled have been shipped confirmed in the system.
[separator style_type=”none” top_margin=”” bottom_margin=”” sep_color=”” border_size=”” icon=”” icon_circle=”” icon_circle_color=”” width=”” alignment=”” class=”” id=””][imageframe lightbox=”no” lightbox_image=”” style_type=”none” hover_type=”none” bordercolor=”” bordersize=”0px” borderradius=”0″ stylecolor=”” align=”none” link=”” linktarget=”_self” animation_type=”0″ animation_direction=”down” animation_speed=”0.1″ animation_offset=”” hide_on_mobile=”no” class=”” id=””] 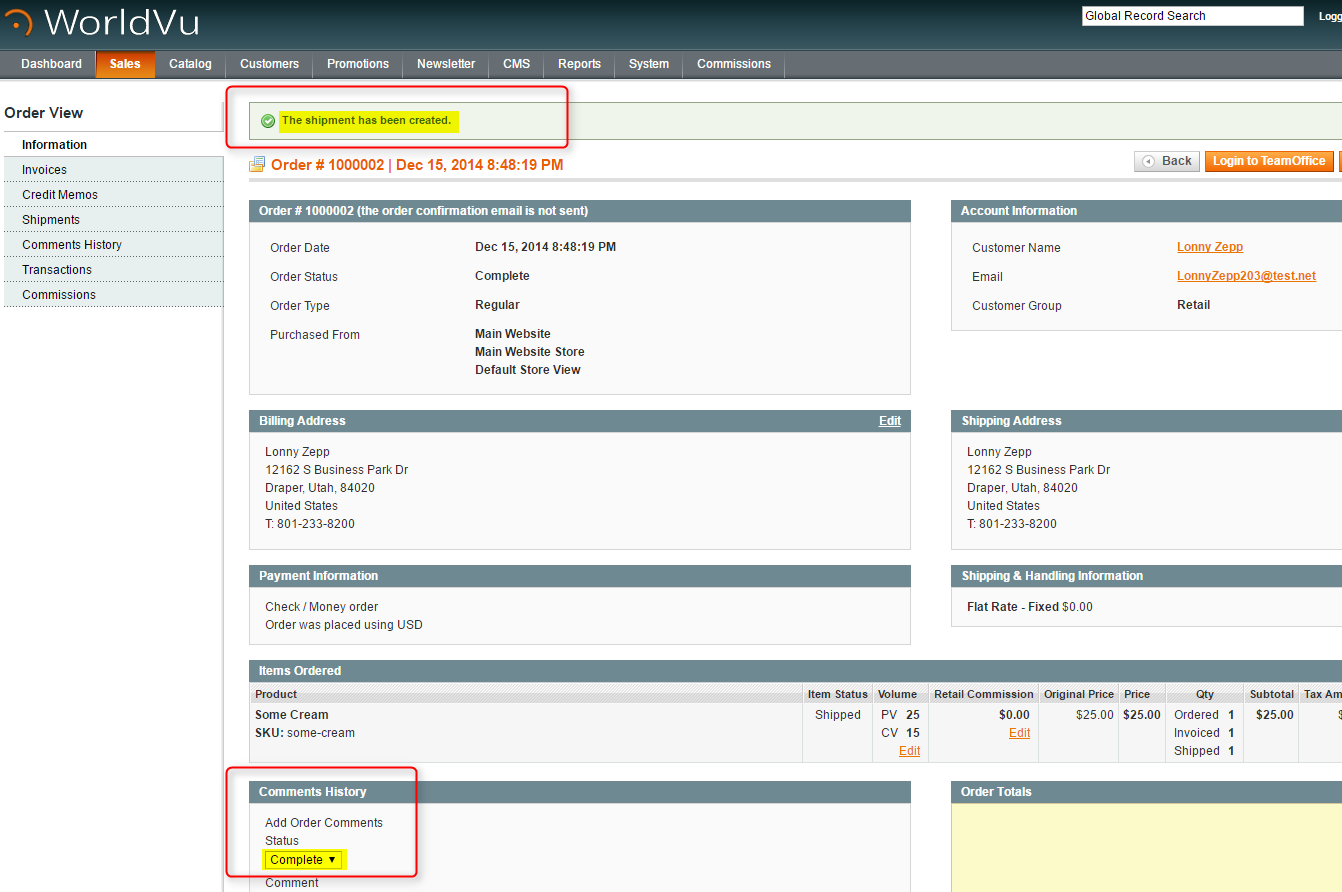 [/imageframe][separator style_type=”none” top_margin=”” bottom_margin=”” sep_color=”” border_size=”” icon=”” icon_circle=”” icon_circle_color=”” width=”” alignment=”” class=”” id=””]
- Repeat the steps located in this training each time you process orders.
Additional Information:
The instructions in this training are designed to support low volume In-House shipments. When volumes grow larger but are still not a size requiring a third partly logistics company (3PL), you may wish to investigate Shippingeasy.com if you did not already chose it at the beginning. Shippingeasy.com has been vetted and approved to work with your WorldVu system. Shippingeasy.com can help automate and facilitate many of the manual processes that are listed in this training and may eliminate the issues that become more difficult to manage as your company grows.
Get started right now with a Shippingeasy.com account by clicking on the link below:
[separator style_type=”none” top_margin=”” bottom_margin=”” sep_color=”” border_size=”” icon=”” icon_circle=”” icon_circle_color=”” width=”” alignment=”” class=”” id=””][imageframe lightbox=”no” lightbox_image=”” style_type=”none” hover_type=”none” bordercolor=”” bordersize=”0px” borderradius=”0″ stylecolor=”” align=”none” link=”” linktarget=”_self” animation_type=”0″ animation_direction=”down” animation_speed=”0.1″ animation_offset=”” hide_on_mobile=”no” class=”” id=””]  [/imageframe][separator style_type=”none” top_margin=”” bottom_margin=”” sep_color=”” border_size=”” icon=”” icon_circle=”” icon_circle_color=”” width=”” alignment=”” class=”” id=””]
We hope this helps. Check out our other training posts for additional assistance.
[/one_full]