[one_full last=”yes” spacing=”yes” center_content=”no” hide_on_mobile=”no” background_color=”” background_image=”” background_repeat=”no-repeat” background_position=”left top” hover_type=”none” link=”” border_position=”all” border_size=”0px” border_color=”” border_style=”” padding=”” margin_top=”” margin_bottom=”” animation_type=”” animation_direction=”” animation_speed=”0.1″ animation_offset=”” class=”” id=””]
Summary: This training will guide you through the set up needed to export order files to a third party logistics provider (3PL).
Step 1: WorldVu Dashboard
Log into WorldVu Dashboard
Step 2: The Menu
Click on the Sales Tab > Orders Export Tool > Export Profiles
Step 3: The Export Profile Set Up
- You may create a new export profile by clicking on the “Create a new export profile” button. This is not necessary as you may modify the current default profile already available. If you choose to create a new profile then just follow the same steps presented in this document.
- Click on the “default” profile listed in the “Orders Export Tool” page.
[separator style_type=”none” top_margin=”” bottom_margin=”” sep_color=”” border_size=”” icon=”” icon_circle=”” icon_circle_color=”” width=”” alignment=”” class=”” id=””][imageframe lightbox=”no” lightbox_image=”” style_type=”none” hover_type=”none” bordercolor=”” bordersize=”0px” borderradius=”0″ stylecolor=”” align=”none” link=”” linktarget=”_self” animation_type=”0″ animation_direction=”down” animation_speed=”0.1″ animation_offset=”” hide_on_mobile=”no” class=”” id=””]  [/imageframe][separator style_type=”none” top_margin=”” bottom_margin=”” sep_color=”” border_size=”” icon=”” icon_circle=”” icon_circle_color=”” width=”” alignment=”” class=”” id=””]
Step 4: Using the “Orders Export Tool”
After creating a new export profile or after clicking on the “default” profile you will now be on the “Orders Export Tool” page. The “Orders Export Tool” page should be defaulted on “Configuration“.
- “File name” is currently set to “default” but the name can be changed to anything that will fit in the space provided.
- “File type” is defaulted to the most common file type “csv” but you may change this to another format.
- “File directory” should not be modified. It should read “/var/export/”. If this is changed by mistake it will not work.
- “File name format” will default to the {“File name”.”File type”} for example, default.csv. You may change the format to match one of the formats provided in the drop down menu that will add the date to the name.
- “Export from Store View” should remain set on the “Default Store View” unless your company has other store views in which case prior training should have been given to accommodate multiple store views.
- “Flag each exported order” this should be set to “yes” and should not be changed. If it is set to “no” you will not be able to distinguish orders previously exported.
- “Export only unmarked orders” should be set to “yes” if not already defaulted. If this is not set to “yes” the system will export all previous orders every time you run an export.
- There will be a black box that appears on the “Orders Export Tool” page. Ignore this box for now and know it will be used later in this training.
- If any changes were made on this page remember to click “Save & Continue” before moving to the next page to assure your changes are not lost.
[separator style_type=”none” top_margin=”” bottom_margin=”” sep_color=”” border_size=”” icon=”” icon_circle=”” icon_circle_color=”” width=”” alignment=”” class=”” id=””][imageframe lightbox=”no” lightbox_image=”” style_type=”none” hover_type=”none” bordercolor=”” bordersize=”0px” borderradius=”0″ stylecolor=”” align=”none” link=”” linktarget=”_self” animation_type=”0″ animation_direction=”down” animation_speed=”0.1″ animation_offset=”” hide_on_mobile=”no” class=”” id=””]  [/imageframe][separator style_type=”none” top_margin=”” bottom_margin=”” sep_color=”” border_size=”” icon=”” icon_circle=”” icon_circle_color=”” width=”” alignment=”” class=”” id=””]
Step 5: Setting up the Orders Export “Template”.
- While on the “Orders Export Tool” page, click on “Template“.
- “Include header” should be set as default “yes” and should remain unless the Fulfillment House/Shippers request the header removed.
- “Columns name” and “Pattern” under the “Include header” are defaulted to a few examples in the default profile. To populate the “Columns name” and “Pattern” fields you will rely on the information listed in the library (black box). Click on “Load Library” which will bring up the “Attribute groups” and “pattern” names associated with these attributes.
- Click on “Add Field” to add additional fields to the order export file. Although the Column names may be changed, you may not change the pattern names as they are associated with the database and identify the appropriate information which will be presented in your “Order Export File”.
- You may change the order of the “File Template” by shifting the “Columns name” and “Pattern” up or down by using the arrow key buttons located to the left of each line.
- You may verify the “File Template” data by clicking on “Check data” located within the library (black box). This will bring up a view of how the file will look once it is processed.
- Note: If a certain data field is absent in the attribute/pattern library (Black box) you may request Xennsoft Developers investigate whether the data can be accessed and added to the library.
- “Fields delimiter” is defaulted but may be changed to whatever delimited format that works best for the Fulfillment House/Shipper.
- “Fields enclosure” is defaulted to none but can be changed if required.
- If any changes were made on this page remember to click “Save & Continue” before moving to the next page to assure your changes are not lost.
[separator style_type=”none” top_margin=”” bottom_margin=”” sep_color=”” border_size=”” icon=”” icon_circle=”” icon_circle_color=”” width=”” alignment=”” class=”” id=””][imageframe lightbox=”no” lightbox_image=”” style_type=”none” hover_type=”none” bordercolor=”” bordersize=”0px” borderradius=”0″ stylecolor=”” align=”none” link=”” linktarget=”_self” animation_type=”0″ animation_direction=”down” animation_speed=”0.1″ animation_offset=”” hide_on_mobile=”no” class=”” id=””]  [/imageframe][separator style_type=”none” top_margin=”” bottom_margin=”” sep_color=”” border_size=”” icon=”” icon_circle=”” icon_circle_color=”” width=”” alignment=”” class=”” id=””]
Step 6: Setting up the Orders Export “Filters”.
- While on the “Orders Export Tool” page, click on “Filters“.
- Under “Order Status” you should only have “Processing” check marked as a default setting. All other boxes in the “Order Status” should be unchecked. There may be times in which you wish to run a filter identifying one of the other order types listed in the “Order Status” but this should be done with caution. It is strongly advised that if a separate order type is filtered that this be done by creating and running a separate order export profile.
- Under “Customer Group” all customer groups with orders that need fulfilled should be check marked. Most companies will have Retail, Distributor/Associate and Preferred Customer. The names may differ slightly based on your company’s definitions and what was added during your system set up.
Note: “Advanced filters” may be used with additional training however will not be necessary for the processing of regular orders.
Remember to click “Save & Continue” if changes were made to this page before moving to the next section to prevent loss of updates/changes.
[separator style_type=”none” top_margin=”” bottom_margin=”” sep_color=”” border_size=”” icon=”” icon_circle=”” icon_circle_color=”” width=”” alignment=”” class=”” id=””][imageframe lightbox=”no” lightbox_image=”” style_type=”none” hover_type=”none” bordercolor=”” bordersize=”0px” borderradius=”0″ stylecolor=”” align=”none” link=”” linktarget=”_self” animation_type=”0″ animation_direction=”down” animation_speed=”0.1″ animation_offset=”” hide_on_mobile=”no” class=”” id=””]  [/imageframe][separator style_type=”none” top_margin=”” bottom_margin=”” sep_color=”” border_size=”” icon=”” icon_circle=”” icon_circle_color=”” width=”” alignment=”” class=”” id=””]
Step 7: Setting up Orders Export “Ftp settings”
- While on the “Orders Export Tool” page, click on “Ftp settings“.
- If you are going to send your “Order Export File” by FTP then change the default from “no” to “yes”. If you are not choosing this option then leave the default “no” and move to the the next step.
- Add the appropriate information into the fields as provided by the Fulfillment House/Shipper.
Note: Click on “Save & Continue” if changes where made to this section.
Note: It is advisable to send a test file before executing the company’s first “Order Export File” to verify everything is working and the file is presented in the manner desired by the third party logistics company.
[separator style_type=”none” top_margin=”” bottom_margin=”” sep_color=”” border_size=”” icon=”” icon_circle=”” icon_circle_color=”” width=”” alignment=”” class=”” id=””][imageframe lightbox=”no” lightbox_image=”” style_type=”none” hover_type=”none” bordercolor=”” bordersize=”0px” borderradius=”0″ stylecolor=”” align=”none” link=”” linktarget=”_self” animation_type=”0″ animation_direction=”down” animation_speed=”0.1″ animation_offset=”” hide_on_mobile=”no” class=”” id=””]  [/imageframe][separator style_type=”none” top_margin=”” bottom_margin=”” sep_color=”” border_size=”” icon=”” icon_circle=”” icon_circle_color=”” width=”” alignment=”” class=”” id=””]
Step 8: Setting Up the Orders Export “Email”.
- While on the “Orders Export Tool” page, click on “Email“.
- If you are going to send your “Order Export File” by Email then change the default from “no” to “yes”. If you are not choosing this option then leave the default “no” and move to the the next step.
- Add the appropriate email for the person who will be responsible for the file and who will assure the file is processed/fulfilled. Only one email can be entered into this field to prevent possible duplication of fulfillment however the email may be forwarded as per your company’s SOPs (Standard Operating Procedures).
Note: Click on “Save & Continue” if changes where made to this section.
Note: It is advisable to send a test file before executing the company’s first “Order Export File” to verify everything is working and the file is presented in the manner desired by the third party logistics company.
[separator style_type=”none” top_margin=”” bottom_margin=”” sep_color=”” border_size=”” icon=”” icon_circle=”” icon_circle_color=”” width=”” alignment=”” class=”” id=””][imageframe lightbox=”no” lightbox_image=”” style_type=”none” hover_type=”none” bordercolor=”” bordersize=”0px” borderradius=”0″ stylecolor=”” align=”none” link=”” linktarget=”_self” animation_type=”0″ animation_direction=”down” animation_speed=”0.1″ animation_offset=”” hide_on_mobile=”no” class=”” id=””]  [/imageframe][separator style_type=”none” top_margin=”” bottom_margin=”” sep_color=”” border_size=”” icon=”” icon_circle=”” icon_circle_color=”” width=”” alignment=”” class=”” id=””]
Step 9: Setting up Orders Export “Scheduled tasks”.
- While on the “Orders Export Tool” page, click on “Scheduled tasks“.
- Under “Scheduled tasks” on the page, click on the days and the hours in which your company’s shipping file is to be processed automatically. All orders that have been configured in the “Orders Export Tool” will process according to this schedule.
- The schedule set up on this page will depend on the arrangements made with the Fulfillment House/Shipper.
- You must have chosen either the “FTP settings” option or the “Email” set up for the file to process.
Note: Click on “Save & Continue” if changes where made to this section.
Note: It is advisable to send a test file before executing the company’s first “Order Export File” to verify everything is working and the file is presented in the manner desired by the third party logistics company.
[separator style_type=”none” top_margin=”” bottom_margin=”” sep_color=”” border_size=”” icon=”” icon_circle=”” icon_circle_color=”” width=”” alignment=”” class=”” id=””][imageframe lightbox=”no” lightbox_image=”” style_type=”none” hover_type=”none” bordercolor=”” bordersize=”0px” borderradius=”0″ stylecolor=”” align=”none” link=”” linktarget=”_self” animation_type=”0″ animation_direction=”down” animation_speed=”0.1″ animation_offset=”” hide_on_mobile=”no” class=”” id=””] 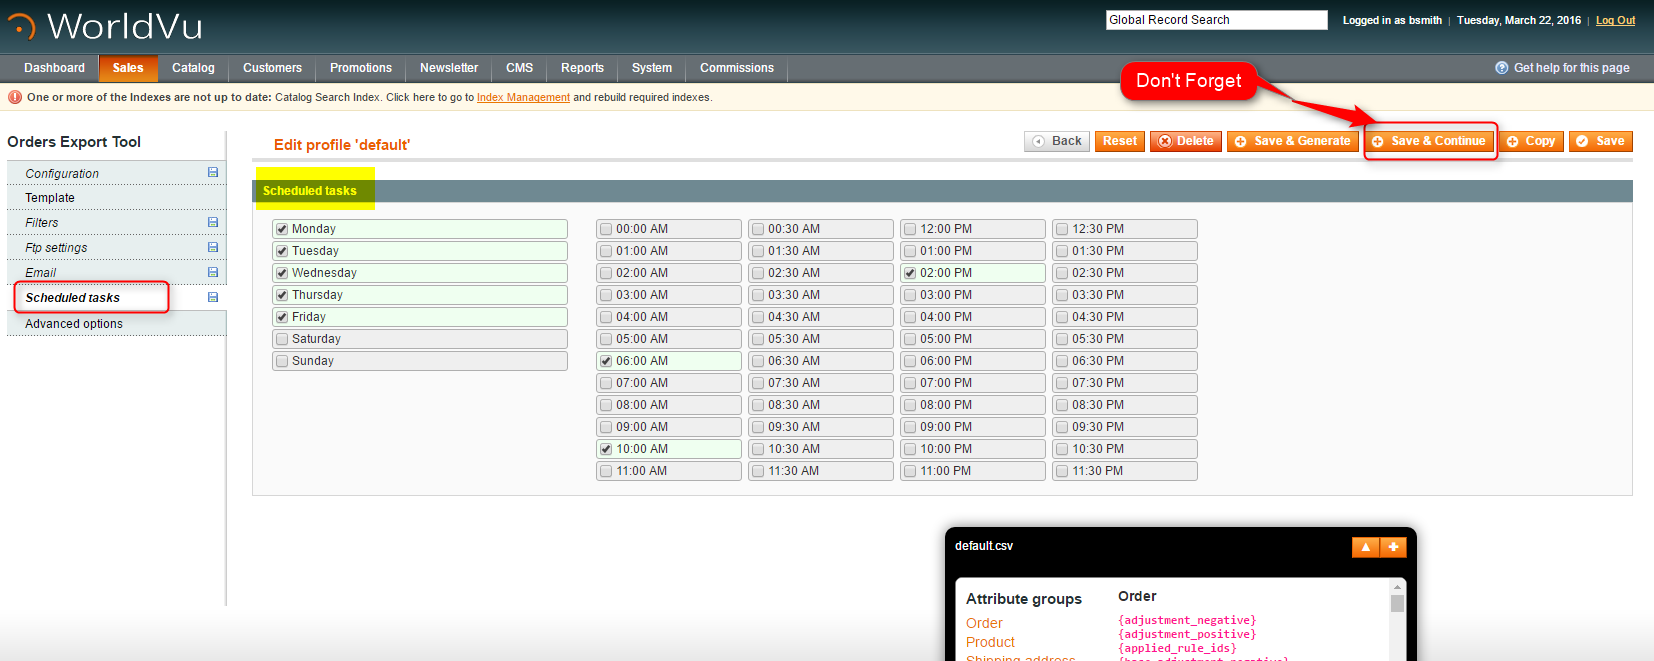 [/imageframe][separator style_type=”none” top_margin=”” bottom_margin=”” sep_color=”” border_size=”” icon=”” icon_circle=”” icon_circle_color=”” width=”” alignment=”” class=”” id=””]
While on the “Orders Export Tool” page, you may notice “Advanced options” listed at the bottom of the menu list for the “Orders Export Tool” page. You do not need to modify information on this page but can verify that the defaults are correct.
- Under “Export each order in a separated file” the default should be “no”.
- Under “Order the data by a specific column (dsv/txt files only)” the default should be “no”
[separator style_type=”none” top_margin=”” bottom_margin=”” sep_color=”” border_size=”” icon=”” icon_circle=”” icon_circle_color=”” width=”” alignment=”” class=”” id=””][imageframe lightbox=”no” lightbox_image=”” style_type=”none” hover_type=”none” bordercolor=”” bordersize=”0px” borderradius=”0″ stylecolor=”” align=”none” link=”” linktarget=”_self” animation_type=”0″ animation_direction=”down” animation_speed=”0.1″ animation_offset=”” hide_on_mobile=”no” class=”” id=””]  [/imageframe][separator style_type=”none” top_margin=”” bottom_margin=”” sep_color=”” border_size=”” icon=”” icon_circle=”” icon_circle_color=”” width=”” alignment=”” class=”” id=””]
Step 10: Index Management
- Verify “Index Management” is updated. When making changes to the system there may be a need to reindex the system.
- You will know there is a need to reindex by seeing the following message listed at the top of all pages within WorldVu. (One or more of the Indexes are not up to date: Catalog Search Index. Click here to go to Index Management and rebuild required indexes.)
[separator style_type=”none” top_margin=”” bottom_margin=”” sep_color=”” border_size=”” icon=”” icon_circle=”” icon_circle_color=”” width=”” alignment=”” class=”” id=””][imageframe lightbox=”no” lightbox_image=”” style_type=”none” hover_type=”none” bordercolor=”” bordersize=”0px” borderradius=”0″ stylecolor=”” align=”none” link=”” linktarget=”_self” animation_type=”0″ animation_direction=”down” animation_speed=”0.1″ animation_offset=”” hide_on_mobile=”no” class=”” id=””]  [/imageframe][separator style_type=”none” top_margin=”” bottom_margin=”” sep_color=”” border_size=”” icon=”” icon_circle=”” icon_circle_color=”” width=”” alignment=”” class=”” id=””]
- Click on the “Index Management” area in the warning line which will bring you to the “Index Management” page.
- Click on all boxes for all indexes that require reindexing. These will be identified in the “status” column.
- Make sure the action box indicates “Reindex Data” then click “Submit”.
[separator style_type=”none” top_margin=”” bottom_margin=”” sep_color=”” border_size=”” icon=”” icon_circle=”” icon_circle_color=”” width=”” alignment=”” class=”” id=””][imageframe lightbox=”no” lightbox_image=”” style_type=”none” hover_type=”none” bordercolor=”” bordersize=”0px” borderradius=”0″ stylecolor=”” align=”none” link=”” linktarget=”_self” animation_type=”0″ animation_direction=”down” animation_speed=”0.1″ animation_offset=”” hide_on_mobile=”no” class=”” id=””]  [/imageframe][separator style_type=”none” top_margin=”” bottom_margin=”” sep_color=”” border_size=”” icon=”” icon_circle=”” icon_circle_color=”” width=”” alignment=”” class=”” id=””]
- Verify you have a successful message after you have reindexed. All the lines in the “Status” and “Update Required” columns should indicate they are “ready” or show “no” and show green.
[separator style_type=”none” top_margin=”” bottom_margin=”” sep_color=”” border_size=”” icon=”” icon_circle=”” icon_circle_color=”” width=”” alignment=”” class=”” id=””][imageframe lightbox=”no” lightbox_image=”” style_type=”none” hover_type=”none” bordercolor=”” bordersize=”0px” borderradius=”0″ stylecolor=”” align=”none” link=”” linktarget=”_self” animation_type=”0″ animation_direction=”down” animation_speed=”0.1″ animation_offset=”” hide_on_mobile=”no” class=”” id=””]  [/imageframe][separator style_type=”none” top_margin=”” bottom_margin=”” sep_color=”” border_size=”” icon=”” icon_circle=”” icon_circle_color=”” width=”” alignment=”” class=”” id=””]
Additional Information:
- Under Sales Tab > Order Export Tool > Customer Attributes. These attributes were added by Xennsoft Developers. If your company has need of additional attributes they can be created by Xennsoft however in most cases all the needed attributes are in the system.
[separator style_type=”none” top_margin=”” bottom_margin=”” sep_color=”” border_size=”” icon=”” icon_circle=”” icon_circle_color=”” width=”” alignment=”” class=”” id=””][imageframe lightbox=”no” lightbox_image=”” style_type=”none” hover_type=”none” bordercolor=”” bordersize=”0px” borderradius=”0″ stylecolor=”” align=”none” link=”” linktarget=”_self” animation_type=”0″ animation_direction=”down” animation_speed=”0.1″ animation_offset=”” hide_on_mobile=”no” class=”” id=””]  [/imageframe][separator style_type=”none” top_margin=”” bottom_margin=”” sep_color=”” border_size=”” icon=”” icon_circle=”” icon_circle_color=”” width=”” alignment=”” class=”” id=””]
- Under Sales Tab > Order Export Tools > Downloader Exporter Files. You can find recent files prepared for fulfillment. These may be downloaded as a backup and used for future reference.
[separator style_type=”none” top_margin=”” bottom_margin=”” sep_color=”” border_size=”” icon=”” icon_circle=”” icon_circle_color=”” width=”” alignment=”” class=”” id=””][imageframe lightbox=”no” lightbox_image=”” style_type=”none” hover_type=”none” bordercolor=”” bordersize=”0px” borderradius=”0″ stylecolor=”” align=”none” link=”” linktarget=”_self” animation_type=”0″ animation_direction=”down” animation_speed=”0.1″ animation_offset=”” hide_on_mobile=”no” class=”” id=””]  [/imageframe][separator style_type=”none” top_margin=”” bottom_margin=”” sep_color=”” border_size=”” icon=”” icon_circle=”” icon_circle_color=”” width=”” alignment=”” class=”” id=””]
We hope this helps. Check out our other training posts for additional assistance.
[/one_full]