Summary: This training will provide instructions that will guide you through the process needed to edit/create “Customer Attributes”, manage each attribute’s relation to key data and manage the group that attribute is assigned to as well as create new attribute groups.
Log into WorldVu Dashboard
- Customers > Customer Attributes > Manage Attributes
Editing Customer Attributes
- Click on the attribute you wish to modify/edit
- On the “Edit Customer Attributes” page, make the appropriate changes
Note: Descriptions/Explanations for each of these fields can be found later in this training under “Creating a Customer Attribute”
- Click on “Manage Label/Options” and make any changes to the Attribute titles
Note: The “Admin” title is the Attribute name that will be visible in WorldVu and to your corporate staff. The “Default Store View” is the Attribute name that will be shown in your main store and the other titles will be the names for the additional Stores you may have created such as international sites.
- When finished with the changes, click “Save Attribute”
[imageframe lightbox=”no” lightbox_image=”” style_type=”none” hover_type=”none” bordercolor=”” bordersize=”0px” borderradius=”0″ stylecolor=”” align=”none” link=”” linktarget=”_self” animation_type=”0″ animation_direction=”down” animation_speed=”0.1″ animation_offset=”” hide_on_mobile=”no” class=”” id=””] 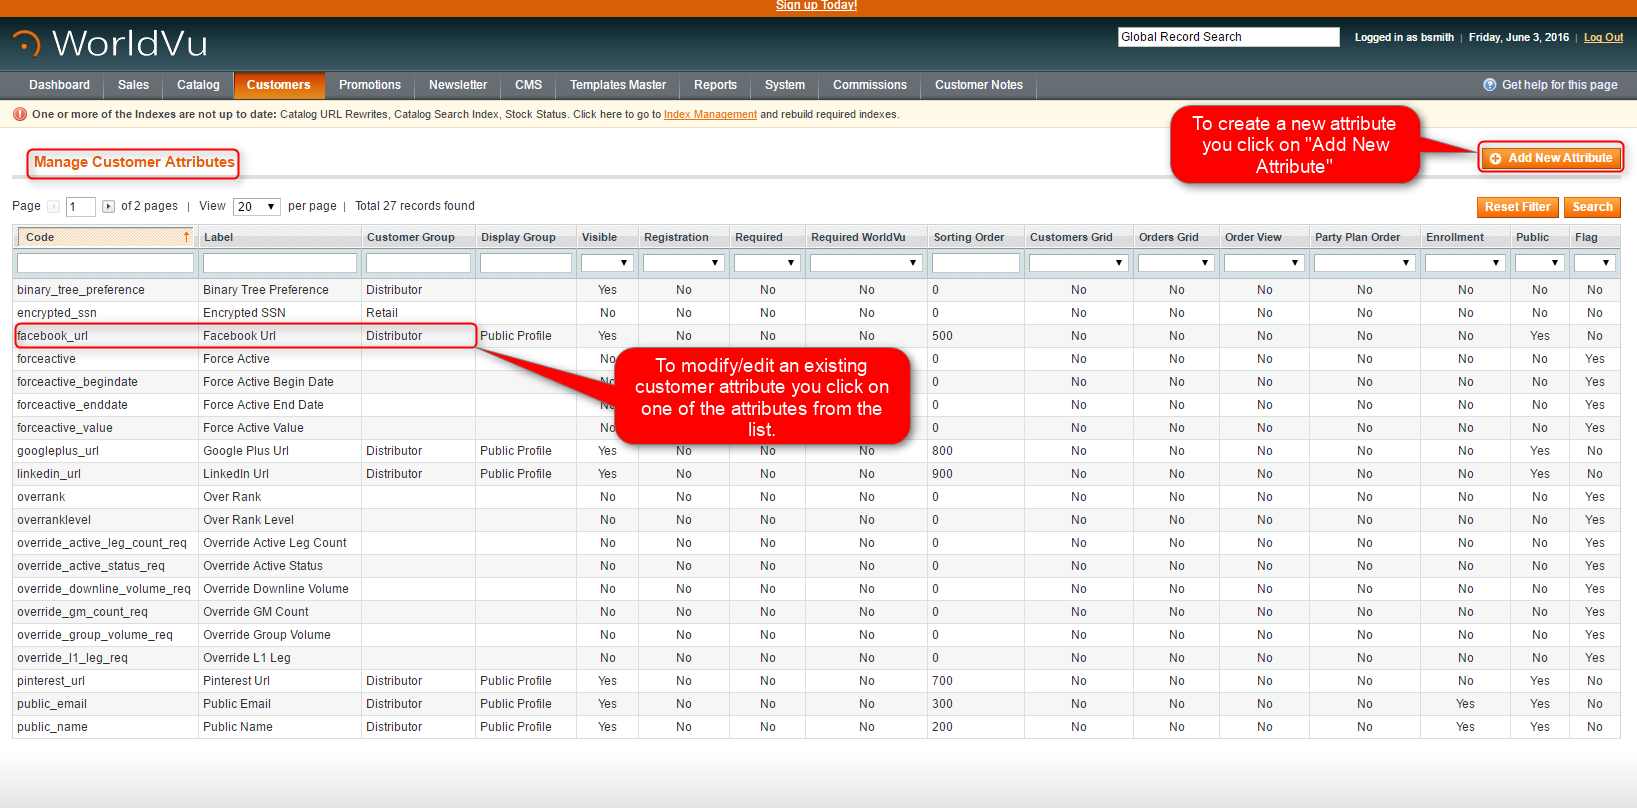 [/imageframe][separator style_type=”single” top_margin=”50″ bottom_margin=”50″ sep_color=”” border_size=”” icon=”” icon_circle=”” icon_circle_color=”” width=”” alignment=”center” class=”” id=””][imageframe lightbox=”no” lightbox_image=”” style_type=”none” hover_type=”none” bordercolor=”” bordersize=”0px” borderradius=”0″ stylecolor=”” align=”none” link=”” linktarget=”_self” animation_type=”0″ animation_direction=”down” animation_speed=”0.1″ animation_offset=”” hide_on_mobile=”no” class=”” id=””]
  [/imageframe][separator style_type=”single” top_margin=”50″ bottom_margin=”50″ sep_color=”” border_size=”” icon=”” icon_circle=”” icon_circle_color=”” width=”” alignment=”center” class=”” id=””][imageframe lightbox=”no” lightbox_image=”” style_type=”none” hover_type=”none” bordercolor=”” bordersize=”0px” borderradius=”0″ stylecolor=”” align=”none” link=”” linktarget=”_self” animation_type=”0″ animation_direction=”down” animation_speed=”0.1″ animation_offset=”” hide_on_mobile=”no” class=”” id=””]
  [/imageframe]
Creating a Customer Attribute
- Click on “Add New Attribute”
- On the “New Customer Attribute” page, add the following fields as required/appropriate
Attribute Properties
- Attribute Code: Add the name of the Attribute. It must be small letters with no spaces
- Store View: You can leave this to “All Store Views” or “Default Store View” if you only have one Store but if there are multiple Stores you will need to decide where the attribute will be visible/applied.
- Input Type: Is determined based on what information is requested
- Default Value: You may place a value into this field which will automatically be placed into the “Input Type” field. This becomes a starting point for the customer however, the customer may change this field
- Visible on Front End: Allows the field to be visible to the customer
- Public Facing: Allows the field to be visible on the customer’s replicated website
- Flag: Enabling the flag allows the attribute to be available in the “Customer Information” page in the menu under “Flags”
- Unique Value: Allows you to require the information requested for this Attribute to be unique. (Example: Social Security/Tax ID Numbers must be unique)
- Value required on Front End: Forces the field to be required when available to a customer
- Value required in WorldVu: Forces the field to be required when the field is filled in by corporate users in WorldVu
- Input Validation: Requires the data input to match the format chosen from the dropdown menu
- Customer Group: Allows you to assign the attribute to one or more customer groups
- Notes: Allows you to place a static note that will display to the customer under the Attribute field
Attribute Configuration
- Show on Manage Customer Grid: Allows the field to show on the “Manage Customers” page
- Show on Orders Grid: Allows the field to show on the “Orders” page
- Is Read Only: Makes the field un-editable
- Show on the Order View Page: Allows the field to show on the Customer’s Account Information page
- Show on Registration: Allows the field to show on the registration page
- Show on Party Plan Order: If applicable to your plan, allows the field to show on the Party Plan order
- Show on Enrollment: Allows the field to show on the enrollment page
- Show in Market Segment: Allows the Attribute to be available as a filter for the market segments in the newsletter.
- Show in Promotion Engine: Allows the Attribute to be available as a filter in the shopping cart promotions area
- Sorting Order: When multiple Attributes are displayed you can place numerical/alpha values onto each Attribute giving priority to the order they will be viewed.
- Group: Allows you to assign the Attribute to Groups. Note: The default is “Public Profile” which is preset to show in certain places during enrollment/registration and on the Replicated website
- Bonus Live Update: Triggers the WorldVu system to recalculate the compensation plan whenever the Attribute is modified. This is used with Attributes that might effect the compensation plan and require immediate system updates (Examples: Rank, Force Active, etc.)
- Edit Once: Limits the customer to a single entry of the information. This is used for information like Social Security/Tax ID numbers that cannot be changed multiple times by the customer
Manage Label/Options
- Specifies the names that will be viewed in “Admin”, “Default Store View” and “Other” stores if any
- Click “Save Attribute”
[imageframe lightbox=”no” lightbox_image=”” style_type=”none” hover_type=”none” bordercolor=”” bordersize=”0px” borderradius=”0″ stylecolor=”” align=”none” link=”” linktarget=”_self” animation_type=”0″ animation_direction=”down” animation_speed=”0.1″ animation_offset=”” hide_on_mobile=”no” class=”” id=””] 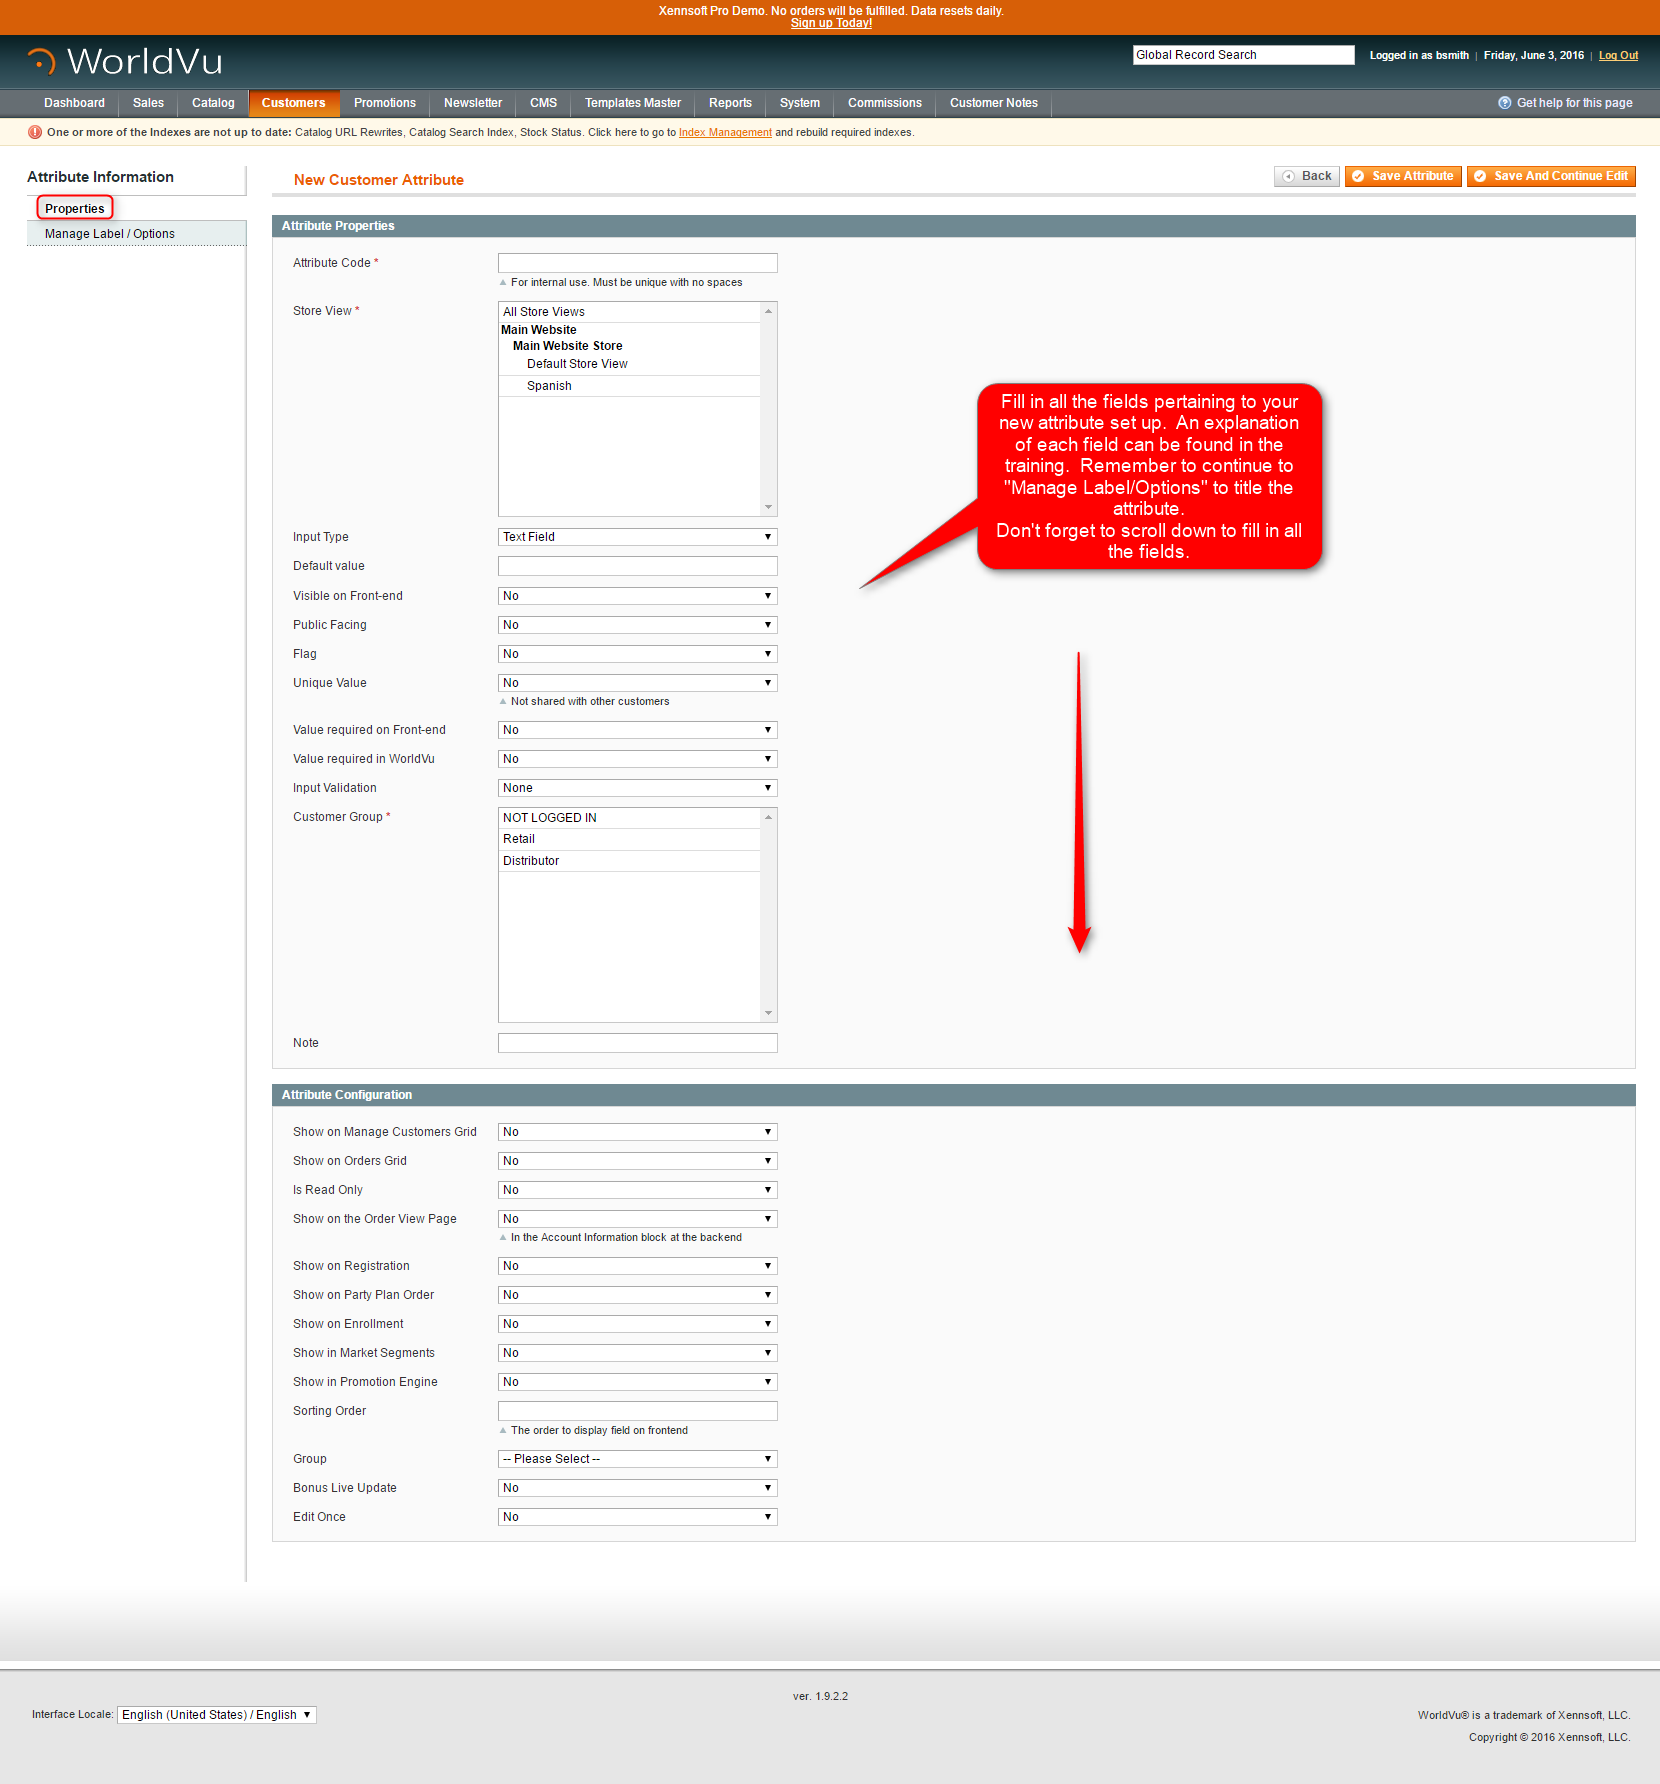 [/imageframe][separator style_type=”single” top_margin=”50″ bottom_margin=”50″ sep_color=”” border_size=”” icon=”” icon_circle=”” icon_circle_color=”” width=”” alignment=”center” class=”” id=””][imageframe lightbox=”no” lightbox_image=”” style_type=”none” hover_type=”none” bordercolor=”” bordersize=”0px” borderradius=”0″ stylecolor=”” align=”none” link=”” linktarget=”_self” animation_type=”0″ animation_direction=”down” animation_speed=”0.1″ animation_offset=”” hide_on_mobile=”no” class=”” id=””]
  [/imageframe]
Editing Attribute Relations
- Go to Customers > Customer Attributes > Manage Relations
- Click on the Attribute you need to edit
- Make appropriate changes
- Click “Save”
Creating Attribute Relations
- Click on “Add New Relation”
- Create a name to identify the Attribute Relation
- Choose a “Parent Attribute” from the dropdown menu
Note: These are preset based on the settings/fields used when setting up your WorldVu system
- Choose the “Attribute Options”. These will vary depending on the “Parent Attribute” chosen
- Assign the “Dependent Attribute” by clicking on all the fields that apply. Those marked in gray will apply
Note: As you add additional Attributes they will appear in the list of “Dependent Attributes” and be available for selection
- When finished, click “Save”
[imageframe lightbox=”no” lightbox_image=”” style_type=”none” hover_type=”none” bordercolor=”” bordersize=”0px” borderradius=”0″ stylecolor=”” align=”none” link=”” linktarget=”_self” animation_type=”0″ animation_direction=”down” animation_speed=”0.1″ animation_offset=”” hide_on_mobile=”no” class=”” id=””]  [/imageframe][separator style_type=”single” top_margin=”50″ bottom_margin=”50″ sep_color=”” border_size=”” icon=”” icon_circle=”” icon_circle_color=”” width=”” alignment=”center” class=”” id=””][imageframe lightbox=”no” lightbox_image=”” style_type=”none” hover_type=”none” bordercolor=”” bordersize=”0px” borderradius=”0″ stylecolor=”” align=”none” link=”” linktarget=”_self” animation_type=”0″ animation_direction=”down” animation_speed=”0.1″ animation_offset=”” hide_on_mobile=”no” class=”” id=””]
  [/imageframe][separator style_type=”single” top_margin=”50″ bottom_margin=”50″ sep_color=”” border_size=”” icon=”” icon_circle=”” icon_circle_color=”” width=”” alignment=”center” class=”” id=””][imageframe lightbox=”no” lightbox_image=”” style_type=”none” hover_type=”none” bordercolor=”” bordersize=”0px” borderradius=”0″ stylecolor=”” align=”none” link=”” linktarget=”_self” animation_type=”0″ animation_direction=”down” animation_speed=”0.1″ animation_offset=”” hide_on_mobile=”no” class=”” id=””]
  [/imageframe]
Editing Attribute Groups
- Go to Customers > Customer Attributes > Manage Groups
- Click on the Attribute group you wish to edit/modify
- Make the appropriate changes
- Click “Save Group”
Creating an Attribute Group
- Click on “Add New Group”
- On the “Add Group” page, add the “Group Name”, the “Sort” identification for prioritization and change the “Status” to “Active”
- Click “Save Group”
Note: Once you assign an Attribute to a group it will display in the areas preassigned for groups however they will be listed under the group name you created in “Add New Group”
Note: “Public Profile” group and other groups are displayed in the customer’s Team Office in the customer’s “Profile”
[imageframe lightbox=”no” lightbox_image=”” style_type=”none” hover_type=”none” bordercolor=”” bordersize=”0px” borderradius=”0″ stylecolor=”” align=”none” link=”” linktarget=”_self” animation_type=”0″ animation_direction=”down” animation_speed=”0.1″ animation_offset=”” hide_on_mobile=”no” class=”” id=””]  [/imageframe][separator style_type=”single” top_margin=”50″ bottom_margin=”50″ sep_color=”” border_size=”” icon=”” icon_circle=”” icon_circle_color=”” width=”” alignment=”center” class=”” id=””][imageframe lightbox=”no” lightbox_image=”” style_type=”none” hover_type=”none” bordercolor=”” bordersize=”0px” borderradius=”0″ stylecolor=”” align=”none” link=”” linktarget=”_self” animation_type=”0″ animation_direction=”down” animation_speed=”0.1″ animation_offset=”” hide_on_mobile=”no” class=”” id=””]
  [/imageframe][separator style_type=”single” top_margin=”50″ bottom_margin=”50″ sep_color=”” border_size=”” icon=”” icon_circle=”” icon_circle_color=”” width=”” alignment=”center” class=”” id=””][imageframe lightbox=”no” lightbox_image=”” style_type=”none” hover_type=”none” bordercolor=”” bordersize=”0px” borderradius=”0″ stylecolor=”” align=”none” link=”” linktarget=”_self” animation_type=”0″ animation_direction=”down” animation_speed=”0.1″ animation_offset=”” hide_on_mobile=”no” class=”” id=””]
  [/imageframe][separator style_type=”single” top_margin=”50″ bottom_margin=”50″ sep_color=”” border_size=”” icon=”” icon_circle=”” icon_circle_color=”” width=”” alignment=”center” class=”” id=””][imageframe lightbox=”no” lightbox_image=”” style_type=”none” hover_type=”none” bordercolor=”” bordersize=”0px” borderradius=”0″ stylecolor=”” align=”none” link=”” linktarget=”_self” animation_type=”0″ animation_direction=”down” animation_speed=”0.1″ animation_offset=”” hide_on_mobile=”no” class=”” id=””]
  [/imageframe][separator style_type=”single” top_margin=”50″ bottom_margin=”50″ sep_color=”” border_size=”” icon=”” icon_circle=”” icon_circle_color=”” width=”” alignment=”center” class=”” id=””][imageframe lightbox=”no” lightbox_image=”” style_type=”none” hover_type=”none” bordercolor=”” bordersize=”0px” borderradius=”0″ stylecolor=”” align=”none” link=”” linktarget=”_self” animation_type=”0″ animation_direction=”down” animation_speed=”0.1″ animation_offset=”” hide_on_mobile=”no” class=”” id=””]
  [/imageframe]
We hope this helps. Check out our other training posts for additional assistance.