[one_full last=”yes” spacing=”yes” center_content=”no” hide_on_mobile=”no” background_color=”” background_image=”” background_repeat=”no-repeat” background_position=”left top” hover_type=”none” link=”” border_position=”all” border_size=”0px” border_color=”” border_style=”” padding=”” margin_top=”” margin_bottom=”” animation_type=”” animation_direction=”” animation_speed=”0.1″ animation_offset=”” class=”” id=””]
Summary: This training will guide you through the process of setting up the payment system used to pay the Associate/Distributor. You will learn how to set up the Associate/Distributor set up page, add a Terms & Conditions agreement for Bonus Bin, create & set up various payment methods along with the export methods for those payment methods. This training will also demonstrate how to process payouts and how to run reports for these payouts.
Step 1: WorldVu Dashboard
- Log into WorldVu
Step 2: Bonus Bin Menu
- Go to System > BonusBin > Settings
[/one_full][imageframe lightbox=”no” lightbox_image=”” style_type=”none” hover_type=”none” bordercolor=”” bordersize=”0px” borderradius=”0″ stylecolor=”” align=”none” link=”” linktarget=”_self” animation_type=”0″ animation_direction=”down” animation_speed=”0.1″ animation_offset=”” hide_on_mobile=”no” class=”” id=””]  [/imageframe][separator style_type=”none” top_margin=”” bottom_margin=”” sep_color=”” border_size=”” icon=”” icon_circle=”” icon_circle_color=”” width=”” alignment=”” class=”” id=””]
Step 3: Bonus Bin Settings
On the “Bonus Bin Settings” page you will be able to set up the required fields fulfilled by Associates/Distributors when they initially create their Bonus Bin. Note: The fields you require will depend on the information you need that was not already gathered during enrollment and which is already found on the main account.
A) Items you may wish to require (Set as Default):
- Date of Birth (DOB)
- Encrypted SSN (Social Security #)
Do not add anything you do not need as it will be required for the Associate/Distributor to set up Bonus Bin.
B) Customize your company’s Terms & Conditions for the Bonus Bin. You may utilize the “Sample” Universal Terms of Service for BonusBin referred to in the links however you must modify it to meet your company’s policies and procedures. We strongly recommend you have the Bonus Bin T&Cs reviewed by legal counsel since Xennsoft takes no responsibility for the content of the document.
Live Link Below:
Universal Terms of Service for BonusBin
[separator style_type=”none” top_margin=”” bottom_margin=”” sep_color=”” border_size=”” icon=”” icon_circle=”” icon_circle_color=”” width=”” alignment=”” class=”” id=””][imageframe lightbox=”no” lightbox_image=”” style_type=”none” hover_type=”none” bordercolor=”” bordersize=”0px” borderradius=”0″ stylecolor=”” align=”none” link=”” linktarget=”_self” animation_type=”0″ animation_direction=”down” animation_speed=”0.1″ animation_offset=”” hide_on_mobile=”no” class=”” id=””]  [/imageframe][separator style_type=”single” top_margin=”50″ bottom_margin=”50″ sep_color=”” border_size=”” icon=”” icon_circle=”” icon_circle_color=”” width=”” alignment=”center” class=”” id=””][imageframe lightbox=”no” lightbox_image=”” style_type=”none” hover_type=”none” bordercolor=”” bordersize=”0px” borderradius=”0″ stylecolor=”” align=”none” link=”” linktarget=”_self” animation_type=”0″ animation_direction=”down” animation_speed=”0.1″ animation_offset=”” hide_on_mobile=”no” class=”” id=””]
  [/imageframe][separator style_type=”none” top_margin=”” bottom_margin=”” sep_color=”” border_size=”” icon=”” icon_circle=”” icon_circle_color=”” width=”” alignment=”” class=”” id=””]
Step 4: Bonus Bin Payment Methods
On the “Bonus Bin Settings” page, click on “Payment Methods”. You will have the choice to use “ACH” or “Check”.
- Click on the payment method you wish to set up. Make sure all fields are set up correctly and active. (Boxes showing “Gray” highlight are the ones active)
- Click “Save”
- Repeat for each payment method
Note(1): If you choose to add another payment (ex. Payment CC) you will need to add that payment method information. Please review the “How to Set Up Additional Payment Methods” training for a step by step guide.
Note(2): “Profile Fields” and “Configuration” settings for each “Payment Method” are set for (ACH) and (Check) however if something needs modified you will need to follow the applicable steps outlined in the “How to Set Up Additional Payment Methods” training.
[separator style_type=”none” top_margin=”” bottom_margin=”” sep_color=”” border_size=”” icon=”” icon_circle=”” icon_circle_color=”” width=”” alignment=”” class=”” id=””][imageframe lightbox=”no” lightbox_image=”” style_type=”none” hover_type=”none” bordercolor=”” bordersize=”0px” borderradius=”0″ stylecolor=”” align=”none” link=”” linktarget=”_self” animation_type=”0″ animation_direction=”down” animation_speed=”0.1″ animation_offset=”” hide_on_mobile=”no” class=”” id=””]  [/imageframe][separator style_type=”single” top_margin=”50″ bottom_margin=”50″ sep_color=”” border_size=”” icon=”” icon_circle=”” icon_circle_color=”” width=”” alignment=”center” class=”” id=””][imageframe lightbox=”no” lightbox_image=”” style_type=”none” hover_type=”none” bordercolor=”” bordersize=”0px” borderradius=”0″ stylecolor=”” align=”none” link=”” linktarget=”_self” animation_type=”0″ animation_direction=”down” animation_speed=”0.1″ animation_offset=”” hide_on_mobile=”no” class=”” id=””]
  [/imageframe][separator style_type=”none” top_margin=”” bottom_margin=”” sep_color=”” border_size=”” icon=”” icon_circle=”” icon_circle_color=”” width=”” alignment=”” class=”” id=””]
Step 5: Bonus Bin Export Methods
After your “Payment Methods” are set up you will need to click on “Export Methods”
- Click on the “Export Method” to verify settings.
- Verify or modify “Basic” info.
- Verify or modify “Config” info.
- If changes are needed refer to the “How to Set Up Additional Payment Methods”.
[separator style_type=”none” top_margin=”” bottom_margin=”” sep_color=”” border_size=”” icon=”” icon_circle=”” icon_circle_color=”” width=”” alignment=”” class=”” id=””][imageframe lightbox=”no” lightbox_image=”” style_type=”none” hover_type=”none” bordercolor=”” bordersize=”0px” borderradius=”0″ stylecolor=”” align=”none” link=”” linktarget=”_self” animation_type=”0″ animation_direction=”down” animation_speed=”0.1″ animation_offset=”” hide_on_mobile=”no” class=”” id=””] 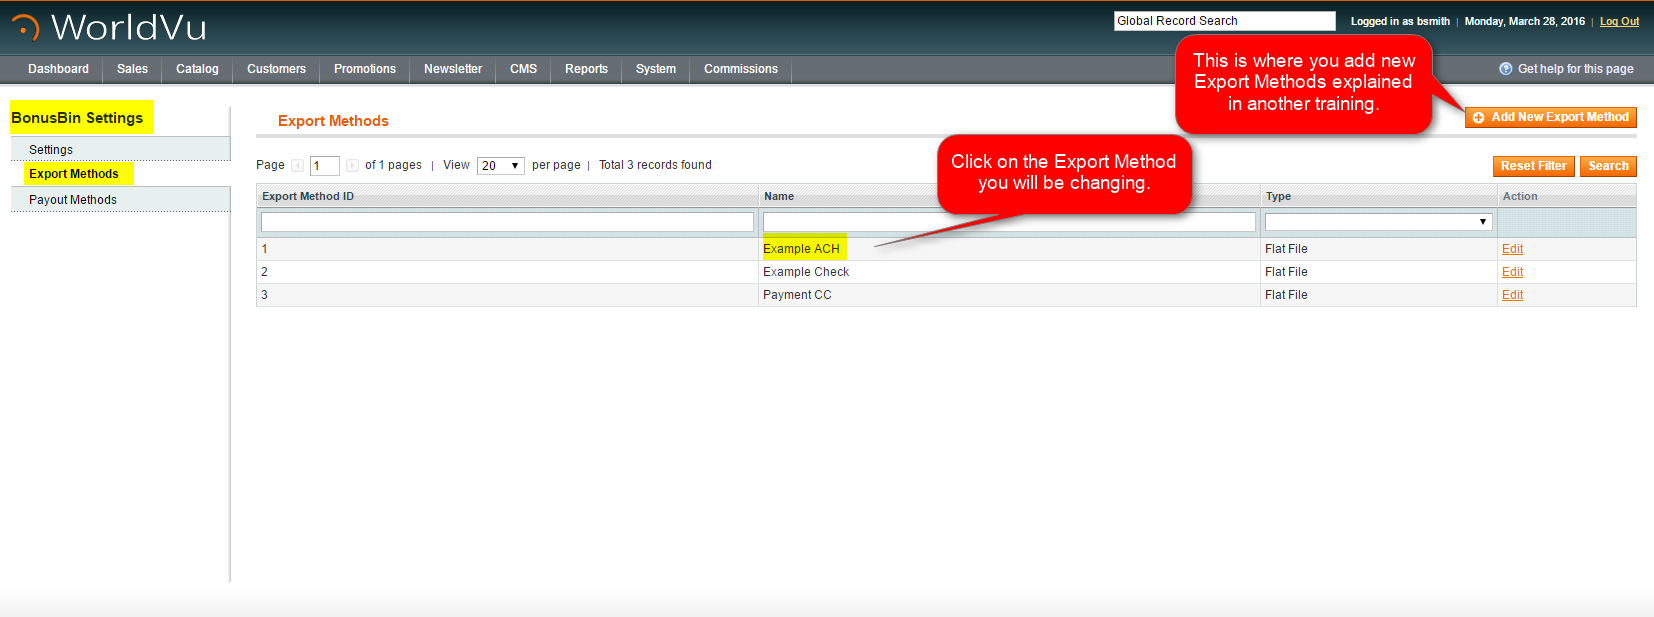 [/imageframe][separator style_type=”single” top_margin=”50″ bottom_margin=”50″ sep_color=”” border_size=”” icon=”” icon_circle=”” icon_circle_color=”” width=”” alignment=”center” class=”” id=””][imageframe lightbox=”no” lightbox_image=”” style_type=”none” hover_type=”none” bordercolor=”” bordersize=”0px” borderradius=”0″ stylecolor=”” align=”none” link=”” linktarget=”_self” animation_type=”0″ animation_direction=”down” animation_speed=”0.1″ animation_offset=”” hide_on_mobile=”no” class=”” id=””]
  [/imageframe][separator style_type=”single” top_margin=”50″ bottom_margin=”50″ sep_color=”” border_size=”” icon=”” icon_circle=”” icon_circle_color=”” width=”” alignment=”center” class=”” id=””][imageframe lightbox=”no” lightbox_image=”” style_type=”none” hover_type=”none” bordercolor=”” bordersize=”0px” borderradius=”0″ stylecolor=”” align=”none” link=”” linktarget=”_self” animation_type=”0″ animation_direction=”down” animation_speed=”0.1″ animation_offset=”” hide_on_mobile=”no” class=”” id=””]
  [/imageframe][separator style_type=”none” top_margin=”” bottom_margin=”” sep_color=”” border_size=”” icon=”” icon_circle=”” icon_circle_color=”” width=”” alignment=”” class=”” id=””]
Step 6: Bonus Bin Payment Processing
You are now ready to process payouts for Associates/Distributors who have set up Bonus Bin and requested funds generated by the Commission Pay Plan. Click on System Tab > Bonus Bin > Management.
- Ignore “Fund Accounts” this is explained in another training “How to Fund Bonus Bin”.
- Click on “Process Payouts” and choose “Next” to run the export for the requested funds. If you have multiple payout methods you will need to check in the drop down menu to verify if there are any pending requests for other methods. Click “Next”.
[separator style_type=”none” top_margin=”” bottom_margin=”” sep_color=”” border_size=”” icon=”” icon_circle=”” icon_circle_color=”” width=”” alignment=”” class=”” id=””][imageframe lightbox=”no” lightbox_image=”” style_type=”none” hover_type=”none” bordercolor=”” bordersize=”0px” borderradius=”0″ stylecolor=”” align=”none” link=”” linktarget=”_self” animation_type=”0″ animation_direction=”down” animation_speed=”0.1″ animation_offset=”” hide_on_mobile=”no” class=”” id=””] 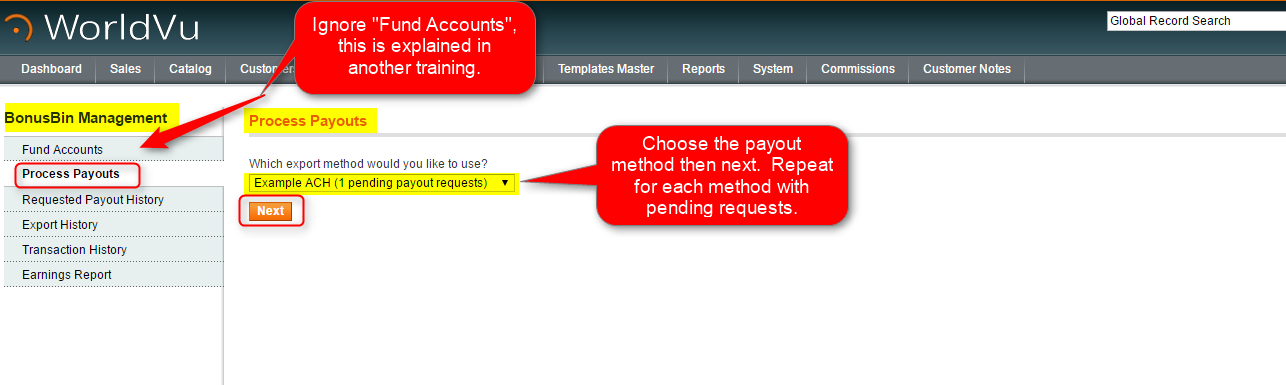 [/imageframe][separator style_type=”none” top_margin=”” bottom_margin=”” sep_color=”” border_size=”” icon=”” icon_circle=”” icon_circle_color=”” width=”” alignment=”” class=”” id=””]
- Click on “Select All” to make sure all payouts you wish to process will be exported.
- Click “Run the Export ACH” or for a check or for a CC#, etc. depending on the method.
Note: You may run a preview if you would like to see what will process before running the final export.
WARNING: The “Preview” file will look the same as the “Run” file however the “Preview” file will not clear the pending requests. Make sure to verify you have completed the run for all requests and never use the “Preview” file to send to the bank or to fulfill checks.
[separator style_type=”none” top_margin=”” bottom_margin=”” sep_color=”” border_size=”” icon=”” icon_circle=”” icon_circle_color=”” width=”” alignment=”” class=”” id=””][imageframe lightbox=”no” lightbox_image=”” style_type=”none” hover_type=”none” bordercolor=”” bordersize=”0px” borderradius=”0″ stylecolor=”” align=”none” link=”” linktarget=”_self” animation_type=”0″ animation_direction=”down” animation_speed=”0.1″ animation_offset=”” hide_on_mobile=”no” class=”” id=””]  [/imageframe][separator style_type=”none” top_margin=”” bottom_margin=”” sep_color=”” border_size=”” icon=”” icon_circle=”” icon_circle_color=”” width=”” alignment=”” class=”” id=””]
- You may view a history of all the requests for payout along with identification of which requests are of different “Status” by choosing from the drop down menu.
[separator style_type=”none” top_margin=”” bottom_margin=”” sep_color=”” border_size=”” icon=”” icon_circle=”” icon_circle_color=”” width=”” alignment=”” class=”” id=””][imageframe lightbox=”no” lightbox_image=”” style_type=”none” hover_type=”none” bordercolor=”” bordersize=”0px” borderradius=”0″ stylecolor=”” align=”none” link=”” linktarget=”_self” animation_type=”0″ animation_direction=”down” animation_speed=”0.1″ animation_offset=”” hide_on_mobile=”no” class=”” id=””]  [/imageframe][separator style_type=”none” top_margin=”” bottom_margin=”” sep_color=”” border_size=”” icon=”” icon_circle=”” icon_circle_color=”” width=”” alignment=”” class=”” id=””]
- You may view a history of all the export requests processed or previewed by your company.
[separator style_type=”none” top_margin=”” bottom_margin=”” sep_color=”” border_size=”” icon=”” icon_circle=”” icon_circle_color=”” width=”” alignment=”” class=”” id=””][imageframe lightbox=”no” lightbox_image=”” style_type=”none” hover_type=”none” bordercolor=”” bordersize=”0px” borderradius=”0″ stylecolor=”” align=”none” link=”” linktarget=”_self” animation_type=”0″ animation_direction=”down” animation_speed=”0.1″ animation_offset=”” hide_on_mobile=”no” class=”” id=””]  [/imageframe][separator style_type=”none” top_margin=”” bottom_margin=”” sep_color=”” border_size=”” icon=”” icon_circle=”” icon_circle_color=”” width=”” alignment=”” class=”” id=””]
- You may view a history of all the individual payouts along with related transaction fees in the “Transaction History”.
[separator style_type=”none” top_margin=”” bottom_margin=”” sep_color=”” border_size=”” icon=”” icon_circle=”” icon_circle_color=”” width=”” alignment=”” class=”” id=””][imageframe lightbox=”no” lightbox_image=”” style_type=”none” hover_type=”none” bordercolor=”” bordersize=”0px” borderradius=”0″ stylecolor=”” align=”none” link=”” linktarget=”_self” animation_type=”0″ animation_direction=”down” animation_speed=”0.1″ animation_offset=”” hide_on_mobile=”no” class=”” id=””] ![]() [/imageframe][separator style_type=”none” top_margin=”” bottom_margin=”” sep_color=”” border_size=”” icon=”” icon_circle=”” icon_circle_color=”” width=”” alignment=”” class=”” id=””]
[/imageframe][separator style_type=”none” top_margin=”” bottom_margin=”” sep_color=”” border_size=”” icon=”” icon_circle=”” icon_circle_color=”” width=”” alignment=”” class=”” id=””]
- The “Earnings Report” will be the source report for running 1099s at the end of the year and can be a powerful report for payout analysis.
[separator style_type=”none” top_margin=”” bottom_margin=”” sep_color=”” border_size=”” icon=”” icon_circle=”” icon_circle_color=”” width=”” alignment=”” class=”” id=””][imageframe lightbox=”no” lightbox_image=”” style_type=”none” hover_type=”none” bordercolor=”” bordersize=”0px” borderradius=”0″ stylecolor=”” align=”none” link=”” linktarget=”_self” animation_type=”0″ animation_direction=”down” animation_speed=”0.1″ animation_offset=”” hide_on_mobile=”no” class=”” id=””]  [/imageframe][separator style_type=”none” top_margin=”” bottom_margin=”” sep_color=”” border_size=”” icon=”” icon_circle=”” icon_circle_color=”” width=”” alignment=”” class=”” id=””]
We hope this helps. Check out our other training posts for additional assistance.