[one_full last=”yes” spacing=”yes” center_content=”no” hide_on_mobile=”no” background_color=”” background_image=”” background_repeat=”no-repeat” background_position=”left top” hover_type=”none” link=”” border_position=”all” border_size=”0px” border_color=”” border_style=”” padding=”” margin_top=”” margin_bottom=”” animation_type=”” animation_direction=”” animation_speed=”0.1″ animation_offset=”” class=”” id=””]
Summary: This training will guide you through the processes of refunding an order, issuing a credit for shipping, providing a financial Customer Service compensation and subtracting fees from refunds for things like restocking of inventory for customer returns.
Step 1: WorldVu Dashboard
Log into WorldVu Dashboard
Step 2: Orders Page
Click on the Sales Tab > Orders.
[separator style_type=”none” top_margin=”” bottom_margin=”” sep_color=”” border_size=”” icon=”” icon_circle=”” icon_circle_color=”” width=”” alignment=”” class=”” id=””][imageframe lightbox=”no” lightbox_image=”” style_type=”none” hover_type=”none” bordercolor=”” bordersize=”0px” borderradius=”0″ stylecolor=”” align=”none” link=”” linktarget=”_self” animation_type=”0″ animation_direction=”down” animation_speed=”0.1″ animation_offset=”” hide_on_mobile=”no” class=”” id=””]  [/imageframe][separator style_type=”none” top_margin=”” bottom_margin=”” sep_color=”” border_size=”” icon=”” icon_circle=”” icon_circle_color=”” width=”” alignment=”” class=”” id=””]
Step 3: Identifying the Order to Refund
Once on the “Orders” page you will be able to search for the customer’s order you would like to refund. The “Credit Memo” feature (identified later) allows you to either credit the entire order or select specific product quantities to refund. You may also make additional adjustments to the invoice by refunding shipping, adding fees such as restocking fees and deducting costs for customer service compensations.
A) On the “Orders” page you can search for the order you wish to refund. This can be done by:
- “Order #”
- “Date Range” of when the order was placed
- “Billing Name”
- “Ship To Name”
- “Status” of the order (Processing, Complete, Hold, etc.)
- “Order Type” (Regular, Autoship, etc.)
[separator style_type=”none” top_margin=”” bottom_margin=”” sep_color=”” border_size=”” icon=”” icon_circle=”” icon_circle_color=”” width=”” alignment=”” class=”” id=””][imageframe lightbox=”no” lightbox_image=”” style_type=”none” hover_type=”none” bordercolor=”” bordersize=”0px” borderradius=”0″ stylecolor=”” align=”none” link=”” linktarget=”_self” animation_type=”0″ animation_direction=”down” animation_speed=”0.1″ animation_offset=”” hide_on_mobile=”no” class=”” id=””]  [/imageframe][separator style_type=”none” top_margin=”” bottom_margin=”” sep_color=”” border_size=”” icon=”” icon_circle=”” icon_circle_color=”” width=”” alignment=”” class=”” id=””]
B) Once you found the correct order/customer, click on the order line you wish to refund. This will open the ” Order Detail Page”. Verify this is the correct order. Now you must go to the “Invoices” section.
[separator style_type=”none” top_margin=”” bottom_margin=”” sep_color=”” border_size=”” icon=”” icon_circle=”” icon_circle_color=”” width=”” alignment=”” class=”” id=””][imageframe lightbox=”no” lightbox_image=”” style_type=”none” hover_type=”none” bordercolor=”” bordersize=”0px” borderradius=”0″ stylecolor=”” align=”none” link=”” linktarget=”_self” animation_type=”0″ animation_direction=”down” animation_speed=”0.1″ animation_offset=”” hide_on_mobile=”no” class=”” id=””]  [/imageframe][separator style_type=”none” top_margin=”” bottom_margin=”” sep_color=”” border_size=”” icon=”” icon_circle=”” icon_circle_color=”” width=”” alignment=”” class=”” id=””]
C) Click on the invoice for which you wish to process the Credit Memo/Refund. This will bring you to the “Invoice Detail Page”. Again, verify the information and click on “Credit Memo” in the upper right hand corner of your screen.
[separator style_type=”none” top_margin=”” bottom_margin=”” sep_color=”” border_size=”” icon=”” icon_circle=”” icon_circle_color=”” width=”” alignment=”” class=”” id=””][imageframe lightbox=”no” lightbox_image=”” style_type=”none” hover_type=”none” bordercolor=”” bordersize=”0px” borderradius=”0″ stylecolor=”” align=”none” link=”” linktarget=”_self” animation_type=”0″ animation_direction=”down” animation_speed=”0.1″ animation_offset=”” hide_on_mobile=”no” class=”” id=””]  [/imageframe][separator style_type=”single” top_margin=”50″ bottom_margin=”50″ sep_color=”” border_size=”” icon=”” icon_circle=”” icon_circle_color=”” width=”” alignment=”center” class=”” id=””][imageframe lightbox=”no” lightbox_image=”” style_type=”none” hover_type=”none” bordercolor=”” bordersize=”0px” borderradius=”0″ stylecolor=”” align=”none” link=”” linktarget=”_self” animation_type=”0″ animation_direction=”down” animation_speed=”0.1″ animation_offset=”” hide_on_mobile=”no” class=”” id=””]
 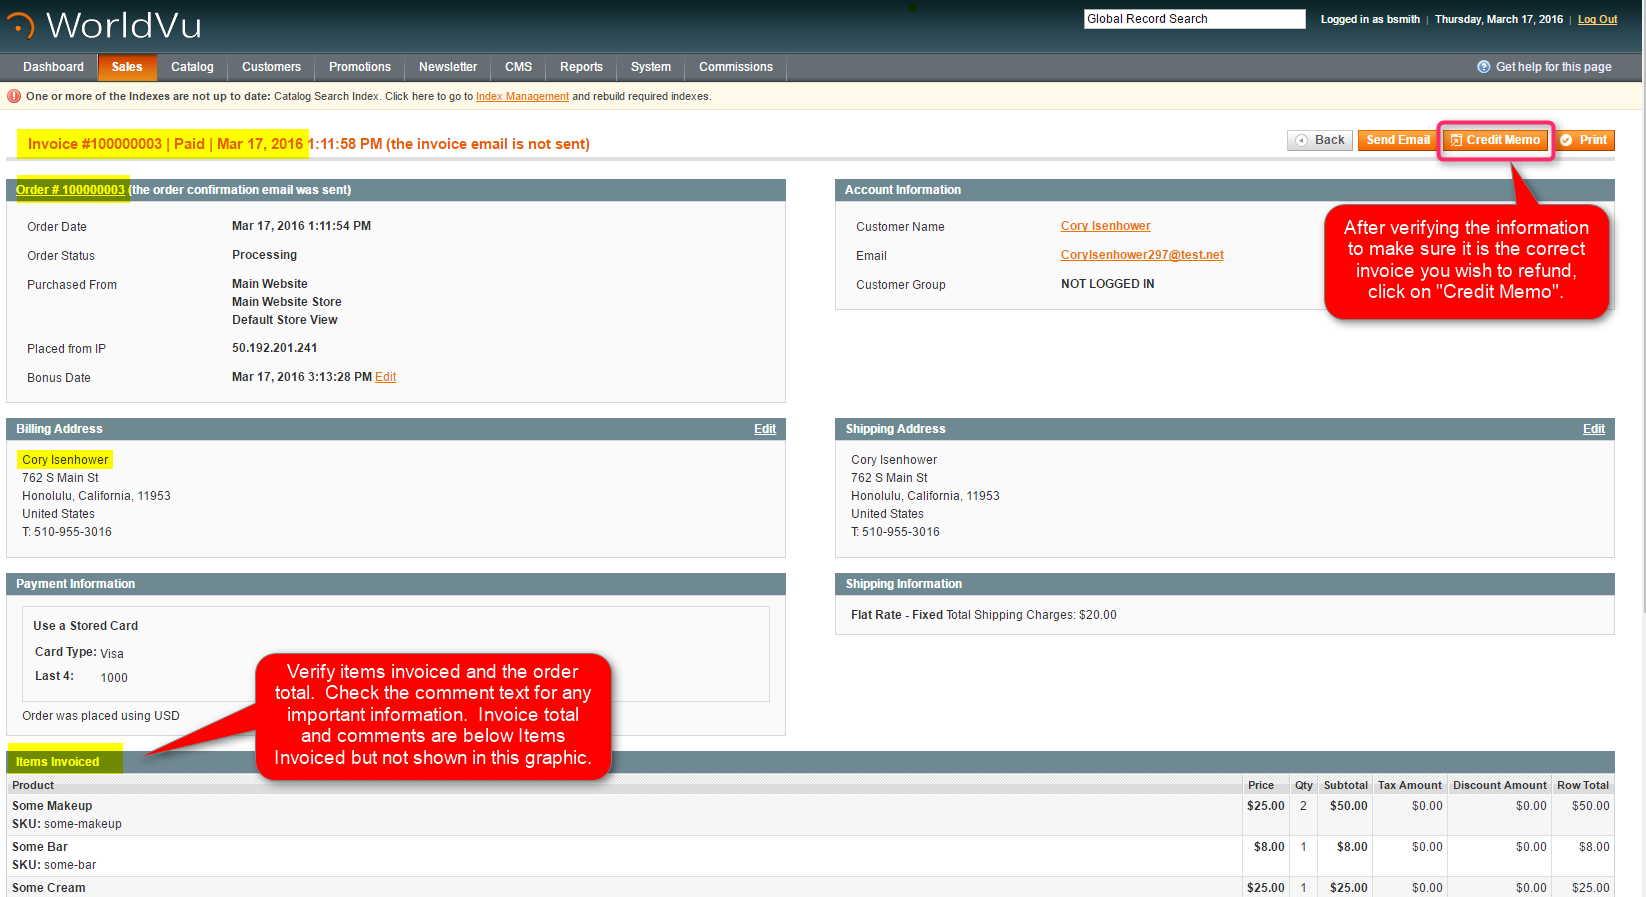 [/imageframe][separator style_type=”none” top_margin=”” bottom_margin=”” sep_color=”” border_size=”” icon=”” icon_circle=”” icon_circle_color=”” width=”” alignment=”” class=”” id=””]
D) Within the “New Credit Memo” page for the invoice you will be able to view “Items to Refund” and “Refund Totals” where you make the appropriate adjustments.
- The Default setup initially has everything ready to refund the entire invoice including the shipping and taxes.
- You may refund some of the product, partial shipping or make adjustments to the invoice as compensation for Customer Service by changing the following:
- Product quantity in “Items to Refund”–deduct the quantity of product you do not wish to refund. These will be the products the customer will keep.
- Shipping cost in “Refund Totals”–Use this line to refund all or part of the shipping or to deduct shipping from the refund.
- Adjustment refund in “Refund Totals”–This area allows the company to add additional funds to the refund in the case where customer compensation is in order as authorized by Customer Service or management.
- The Adjustment Fee in “Refund Totals”–This area allows the company to reduce the refund for fees such as a restocking. This cost listed in this line will be deducted from the total refund and does not require a negative number.
C) You may add comments to the ” Credit Memo” that explain why the credit/refund was issued in the comments section. BE AWARE: Even if the comments are not initially sent to the customer they could be sent later. It is recommended these comments be used to explain the credit/refund as if directed to the customer and other comment sections be used for internal communication.
D) You may send a copy of the “Credit Memo” to the customer which will not include the comments section or you may include the comments with the email that includes the “Credit Memo”. To send the “Credit Memo”, “Comments” or both, click the buttons located next to “Email Copy of Credit Memo” and “Append Comments” before processing the “Credit Memo”.
E) If everything is complete and verified, you are ready to finalize the credit memo/refund. Click “Refund” to process the “Credit Memo” if you are issuing a refund to the CC#(credit card)/Bonus Bin or click “Refund Offline” if you will be processing a check or giving cash directly to the customer.
[separator style_type=”none” top_margin=”” bottom_margin=”” sep_color=”” border_size=”” icon=”” icon_circle=”” icon_circle_color=”” width=”” alignment=”” class=”” id=””][imageframe lightbox=”no” lightbox_image=”” style_type=”none” hover_type=”none” bordercolor=”” bordersize=”0px” borderradius=”0″ stylecolor=”” align=”none” link=”” linktarget=”_self” animation_type=”0″ animation_direction=”down” animation_speed=”0.1″ animation_offset=”” hide_on_mobile=”no” class=”” id=””]  [/imageframe][separator style_type=”none” top_margin=”” bottom_margin=”” sep_color=”” border_size=”” icon=”” icon_circle=”” icon_circle_color=”” width=”” alignment=”” class=”” id=””]
F) Upon completion of the Credit Memo/Refund you will immediately see:
- “Credit Memo” was created.
[separator style_type=”none” top_margin=”” bottom_margin=”” sep_color=”” border_size=”” icon=”” icon_circle=”” icon_circle_color=”” width=”” alignment=”” class=”” id=””][imageframe lightbox=”no” lightbox_image=”” style_type=”none” hover_type=”none” bordercolor=”” bordersize=”0px” borderradius=”0″ stylecolor=”” align=”none” link=”” linktarget=”_self” animation_type=”0″ animation_direction=”down” animation_speed=”0.1″ animation_offset=”” hide_on_mobile=”no” class=”” id=””]  [/imageframe][separator style_type=”none” top_margin=”” bottom_margin=”” sep_color=”” border_size=”” icon=”” icon_circle=”” icon_circle_color=”” width=”” alignment=”” class=”” id=””]
- Comment History showing the actions that have occurred.
[separator style_type=”none” top_margin=”” bottom_margin=”” sep_color=”” border_size=”” icon=”” icon_circle=”” icon_circle_color=”” width=”” alignment=”” class=”” id=””][imageframe lightbox=”no” lightbox_image=”” style_type=”none” hover_type=”none” bordercolor=”” bordersize=”0px” borderradius=”0″ stylecolor=”” align=”none” link=”” linktarget=”_self” animation_type=”0″ animation_direction=”down” animation_speed=”0.1″ animation_offset=”” hide_on_mobile=”no” class=”” id=””]  [/imageframe][separator style_type=”none” top_margin=”” bottom_margin=”” sep_color=”” border_size=”” icon=”” icon_circle=”” icon_circle_color=”” width=”” alignment=”” class=”” id=””]
- Retrieve the “Credit Memo” information by searching within the Sales Tab > Order, Invoices or Credit Memos.
We hope this helps. Check out our other training posts for additional assistance.
[/one_full]