Summary: This training will guide you through the process necessary to create email/newsletter templates which can be used by associates/distributors to communicate to the downlines/customers. This is a powerful resource for your associates/distributors that can be partially controlled by the corporate offices pertaining to branding and overall presentation.
Log into WorldVu Dashboard
- Newsletter > Team Office Templates
[imageframe lightbox=”no” lightbox_image=”” style_type=”none” hover_type=”none” bordercolor=”” bordersize=”0px” borderradius=”0″ stylecolor=”” align=”none” link=”” linktarget=”_self” animation_type=”0″ animation_direction=”down” animation_speed=”0.1″ animation_offset=”” hide_on_mobile=”no” class=”” id=””]  [/imageframe]
Editing Email/Newsletter Templates
- Click on the template from the list to make edits
- Make changes to the “Template Name”, “Enable” and “Template Content” as necessary
- Click “Preview Template” to review changes (You must click “Save and Continue” first in order to save any changes or they will not show in the Preview)
- When finished, click “Save Template”
Note: Every Email/Newsletter template should have the following variables which are located within the “Insert Variable” button which is found in the tools available in the “Template Content” section. Each template must have a (text body) which is labeled “Distributor Message Placeholder”. Each template should also have an (Unsubscribe) which is labeled “Unsubscribed Link Html”. The other design elements are up to you as the company setting the design used by all associates/distributors for that template. Associates/distributors cannot modify design. They can only add a subject line and text into the body.
[imageframe lightbox=”no” lightbox_image=”” style_type=”none” hover_type=”none” bordercolor=”” bordersize=”0px” borderradius=”0″ stylecolor=”” align=”none” link=”” linktarget=”_self” animation_type=”0″ animation_direction=”down” animation_speed=”0.1″ animation_offset=”” hide_on_mobile=”no” class=”” id=””]  [/imageframe]
Creating a New Email/Newsletter Template
- Click on “Add New Template”
- Give your template a “Template Name”
- Make sure “Enable” is set to “Yes”
- Set up your “Template Content” and make sure to add the required “Variables” found in the “Insert Variable” button
- Click “Save and Continue” (If this is not clicked first you will not be able to see the Preview)
- Click “Preview Template” to view the initial design
- Click “Save Template” if finished with changes
[imageframe lightbox=”no” lightbox_image=”” style_type=”none” hover_type=”none” bordercolor=”” bordersize=”0px” borderradius=”0″ stylecolor=”” align=”none” link=”” linktarget=”_self” animation_type=”0″ animation_direction=”down” animation_speed=”0.1″ animation_offset=”” hide_on_mobile=”no” class=”” id=””] 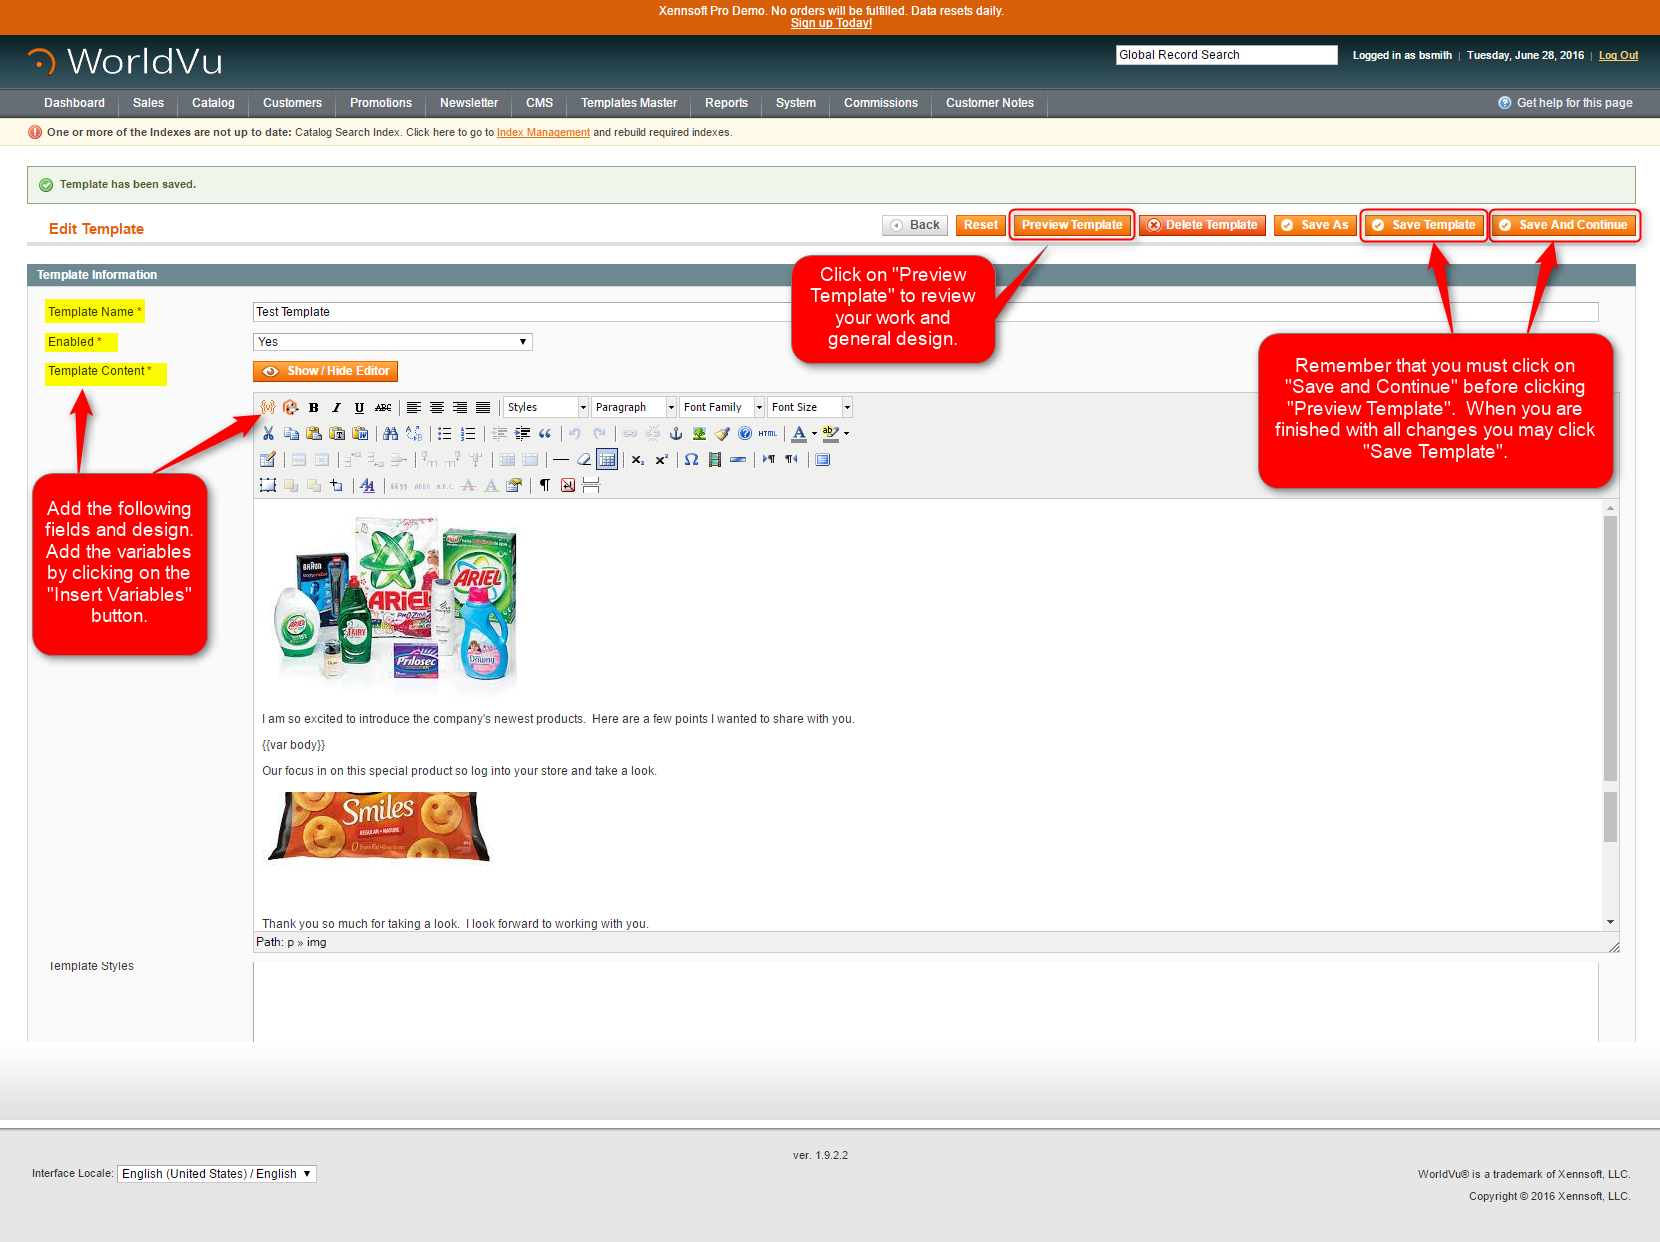 [/imageframe]
Note: You may view the template in Team Office by checking an associate’s/distributor’s account. Click on “Team” to view page. This will show the personally enrolled downline. If there is no downline then there will not be an option to send an email/newsletter. If downline are present, Click on the red envelop to open template options.
Based on the available reports created and allowed in the “Reports” area of the Team Office dashboard the associate/distributor will have additional ways to select specialized groups to whom they can send the email/newsletter templates. You (Corporate Admin) must create those reports in CMS > Team Office Reports in order for options to be available for your associates/distributors. If these reports are created they will allow the associate/distributor to filter their downlines to be used in the “Email Manager” communication options otherwise your associates/distributors will only be able to email their personally enrolled downline showing in their “Team” report.
[imageframe lightbox=”no” lightbox_image=”” style_type=”none” hover_type=”none” bordercolor=”” bordersize=”0px” borderradius=”0″ stylecolor=”” align=”none” link=”” linktarget=”_self” animation_type=”0″ animation_direction=”down” animation_speed=”0.1″ animation_offset=”” hide_on_mobile=”no” class=”” id=””]  [/imageframe][separator style_type=”single” top_margin=”50″ bottom_margin=”50″ sep_color=”” border_size=”” icon=”” icon_circle=”” icon_circle_color=”” width=”” alignment=”center” class=”” id=””][imageframe lightbox=”no” lightbox_image=”” style_type=”none” hover_type=”none” bordercolor=”” bordersize=”0px” borderradius=”0″ stylecolor=”” align=”none” link=”” linktarget=”_self” animation_type=”0″ animation_direction=”down” animation_speed=”0.1″ animation_offset=”” hide_on_mobile=”no” class=”” id=””]
 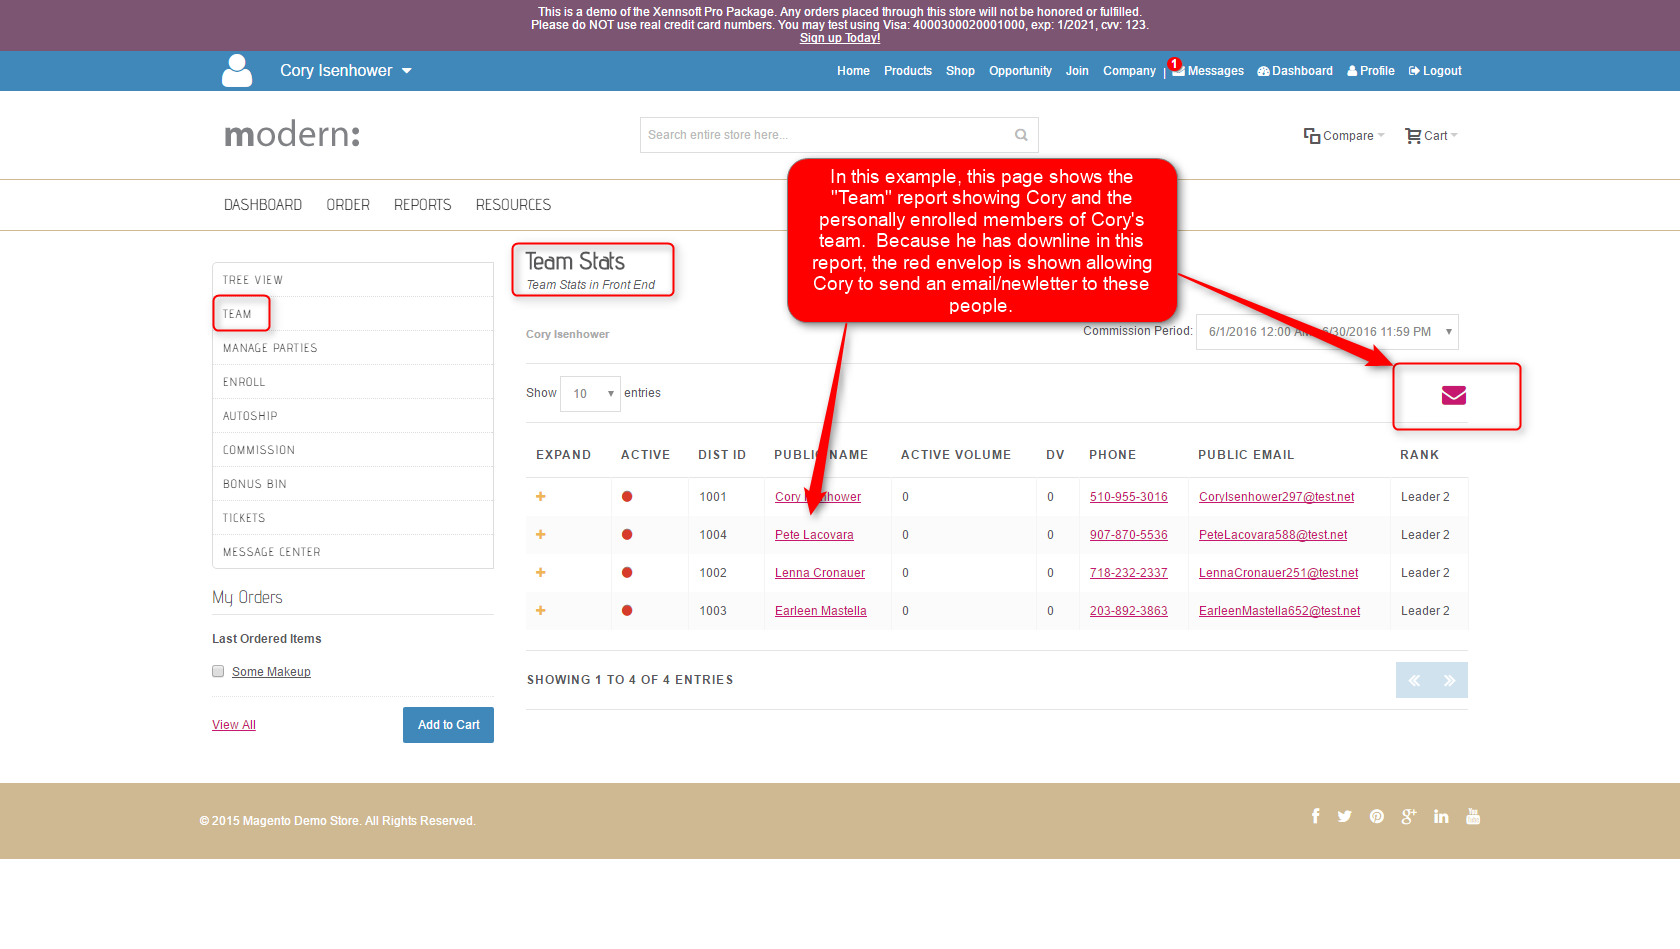 [/imageframe][separator style_type=”single” top_margin=”50″ bottom_margin=”50″ sep_color=”” border_size=”” icon=”” icon_circle=”” icon_circle_color=”” width=”” alignment=”center” class=”” id=””][imageframe lightbox=”no” lightbox_image=”” style_type=”none” hover_type=”none” bordercolor=”” bordersize=”0px” borderradius=”0″ stylecolor=”” align=”none” link=”” linktarget=”_self” animation_type=”0″ animation_direction=”down” animation_speed=”0.1″ animation_offset=”” hide_on_mobile=”no” class=”” id=””]
 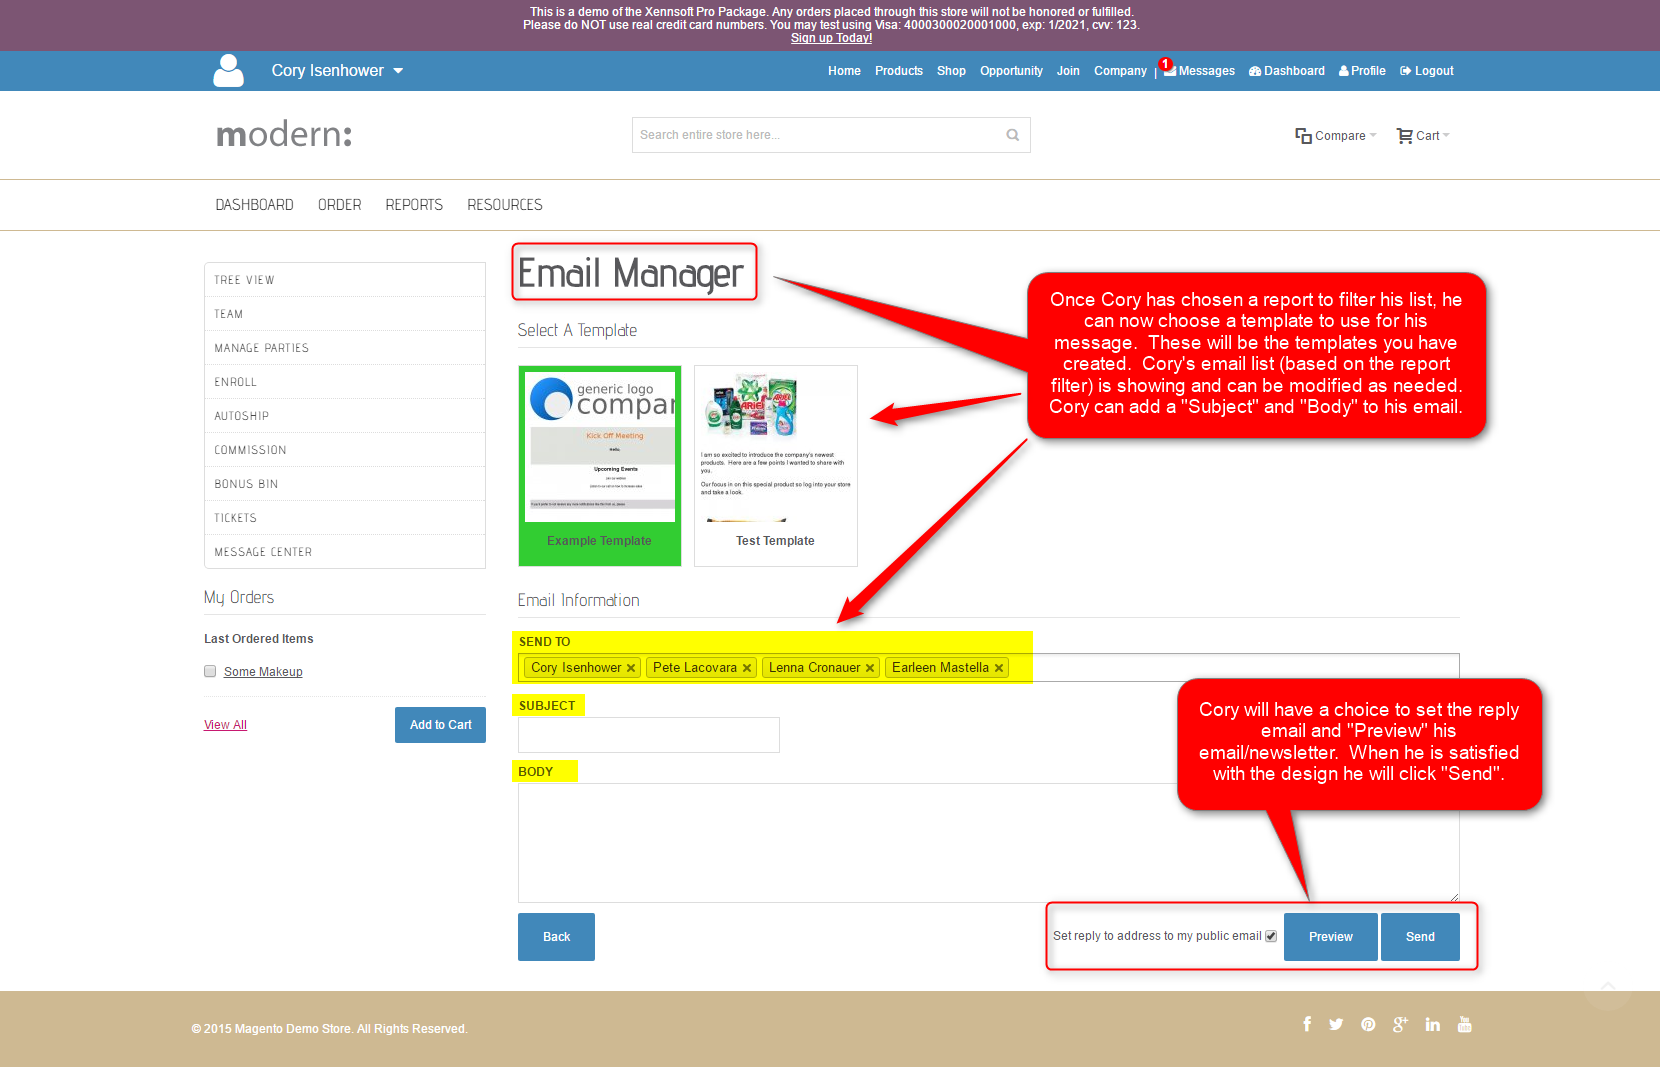 [/imageframe]
We hope this helps. Check out our other training posts for additional assistance.