Summary: This training will guide you through the process needed to set up your customer’s (Associate/Distributor, Retail, Preferred Customer) Dashboards in Team Office which will be seen by customers when they log into the system.
Log into WorldVu Dashboard
- Click on CMS > Dashboards
Modifying the “Dashboard Information” page
- Click on the “Distributor Dashboard” you wish to modify from the list found on this page
- Review the “Dashboard Information” page and modify information as needed
Note: This page should be a template for settings on any new Dashboards you may wish to add.
[imageframe lightbox=”no” lightbox_image=”” style_type=”none” hover_type=”none” bordercolor=”” bordersize=”0px” borderradius=”0″ stylecolor=”” align=”none” link=”” linktarget=”_self” animation_type=”0″ animation_direction=”down” animation_speed=”0.1″ animation_offset=”” hide_on_mobile=”no” class=”” id=””]  [/imageframe][separator style_type=”single” top_margin=”50″ bottom_margin=”50″ sep_color=”” border_size=”” icon=”” icon_circle=”” icon_circle_color=”” width=”” alignment=”center” class=”” id=””][imageframe lightbox=”no” lightbox_image=”” style_type=”none” hover_type=”none” bordercolor=”” bordersize=”0px” borderradius=”0″ stylecolor=”” align=”none” link=”” linktarget=”_self” animation_type=”0″ animation_direction=”down” animation_speed=”0.1″ animation_offset=”” hide_on_mobile=”no” class=”” id=””]
  [/imageframe]
Modifying the “Content” page
- Click on “Content” in the left handed menu to go to the “Content” page
- Add, Edit or Remove “Gadgets” according to the needs of your customer for which the Dashboard was designed.
- Arrange the Gadgets on the page by clicking and dragging them on the page until they are in the order and location you desire.
[imageframe lightbox=”no” lightbox_image=”” style_type=”none” hover_type=”none” bordercolor=”” bordersize=”0px” borderradius=”0″ stylecolor=”” align=”none” link=”” linktarget=”_self” animation_type=”0″ animation_direction=”down” animation_speed=”0.1″ animation_offset=”” hide_on_mobile=”no” class=”” id=””]  [/imageframe]
Modifying the “Design” page
- Click on “Design” in the left handed menu to go to the “Design” page
- Make modifications as needed.
Note: We suggest setting the “Layout” field to “2 columns with left bar” however you may wish to experiment with different options.
- Click on “Save Dashboard” at this point.
Verifying the Dashboard Modifications
- Verify your “Dashboard” by logging into one of the customer types for which the Dashboard was created to view the customer’s Team Office Dashboard.
[imageframe lightbox=”no” lightbox_image=”” style_type=”none” hover_type=”none” bordercolor=”” bordersize=”0px” borderradius=”0″ stylecolor=”” align=”none” link=”” linktarget=”_self” animation_type=”0″ animation_direction=”down” animation_speed=”0.1″ animation_offset=”” hide_on_mobile=”no” class=”” id=””] 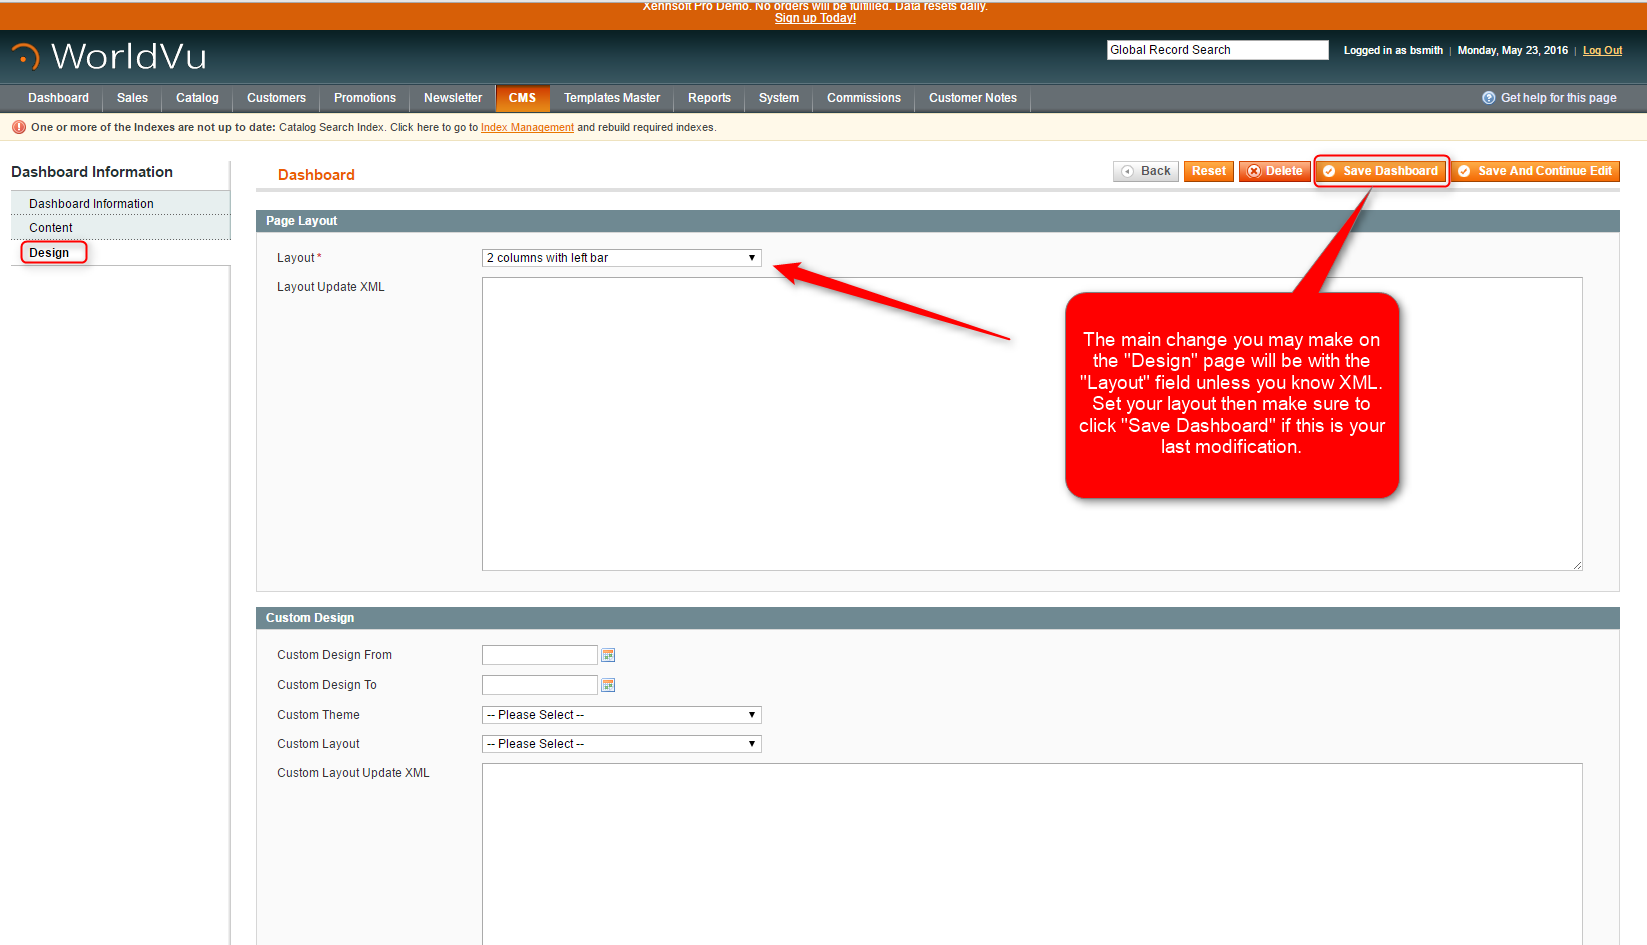 [/imageframe][separator style_type=”single” top_margin=”50″ bottom_margin=”50″ sep_color=”” border_size=”” icon=”” icon_circle=”” icon_circle_color=”” width=”” alignment=”center” class=”” id=””][imageframe lightbox=”no” lightbox_image=”” style_type=”none” hover_type=”none” bordercolor=”” bordersize=”0px” borderradius=”0″ stylecolor=”” align=”none” link=”” linktarget=”_self” animation_type=”0″ animation_direction=”down” animation_speed=”0.1″ animation_offset=”” hide_on_mobile=”no” class=”” id=””]
  [/imageframe]
Creating a New Customer Dashboard
- From the CMS > Dashboard page, click on “Add Dashboard”
- On the “Dashboard Information” page, add the “Name” of the new customer Dashboard
- Add Column Render Size X (px), the suggested default is “125”
- Add Row Render Size X (px), the suggested default is “100”
- Add Margin X (px), the suggested default is “0”
- Add Margin Y (px), the suggested default is “0”
- Click on “Groups” and choose “Retail or Distributor” to identify the customer type
- Change the “Status” to “Active”
- Click on “Content” in the left hand menu
- On the “Content” page, add the appropriate “Gadgets” to the Dashboard
- Click on “Design” in the left hand menu
- On the “Design” page, change the “Layout” to the suggested “2 columns with left bar” setting unless you desire something different.
- Click “Save Dashboard”
Note: You may verify the set up the of the Dashboard by logging into the customer’s Team Office to view the overall presentation of the Dashboard. If changes are needed follow the modification steps in this training.
[imageframe lightbox=”no” lightbox_image=”” style_type=”none” hover_type=”none” bordercolor=”” bordersize=”0px” borderradius=”0″ stylecolor=”” align=”none” link=”” linktarget=”_self” animation_type=”0″ animation_direction=”down” animation_speed=”0.1″ animation_offset=”” hide_on_mobile=”no” class=”” id=””]  [/imageframe][separator style_type=”single” top_margin=”50″ bottom_margin=”50″ sep_color=”” border_size=”” icon=”” icon_circle=”” icon_circle_color=”” width=”” alignment=”center” class=”” id=””][imageframe lightbox=”no” lightbox_image=”” style_type=”none” hover_type=”none” bordercolor=”” bordersize=”0px” borderradius=”0″ stylecolor=”” align=”none” link=”” linktarget=”_self” animation_type=”0″ animation_direction=”down” animation_speed=”0.1″ animation_offset=”” hide_on_mobile=”no” class=”” id=””]
 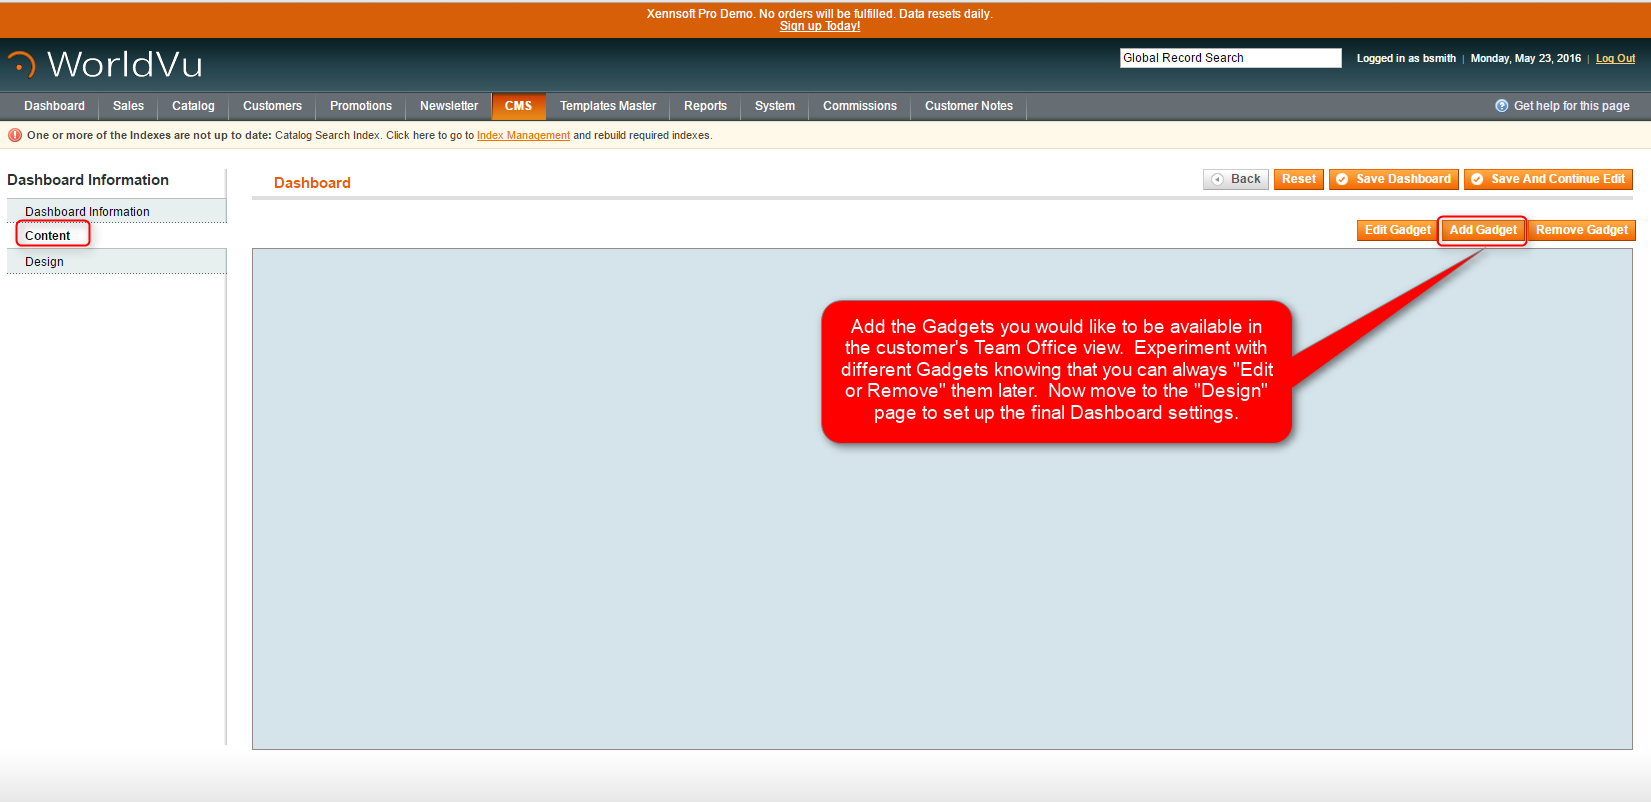 [/imageframe][separator style_type=”single” top_margin=”50″ bottom_margin=”50″ sep_color=”” border_size=”” icon=”” icon_circle=”” icon_circle_color=”” width=”” alignment=”center” class=”” id=””][imageframe lightbox=”no” lightbox_image=”” style_type=”none” hover_type=”none” bordercolor=”” bordersize=”0px” borderradius=”0″ stylecolor=”” align=”none” link=”” linktarget=”_self” animation_type=”0″ animation_direction=”down” animation_speed=”0.1″ animation_offset=”” hide_on_mobile=”no” class=”” id=””]
  [/imageframe]
Additional Information: What Are Gadgets and What Do They Do?
Note: Gadgets can easily be added, edited and removed from Dashboards. Below are some quick references to their functions.
- Rank & Status Requirements Gadget–Provides information to the Associate/Distributor about their current rank and the requirements needed to get to the next rank
- Volume Gadget–Provides commissionable volume information
- Count Box Gadget–Provides data for the customer based on a variety of choices available during set up of the Gadget
- Hello Name Gadget–Provides the customer’s name as well as some brief instructions
- Order History Gadget–Provides information about prior orders placed by the customer
- Account Info Gadget–Provides information about the customer’s account
- Text Gadget–allows you to place any text information onto the customer’s Dashboard
- CMS Block Gadget–allows you to place any CMS block information onto the customer’s Dashboard
[imageframe lightbox=”no” lightbox_image=”” style_type=”none” hover_type=”none” bordercolor=”” bordersize=”0px” borderradius=”0″ stylecolor=”” align=”none” link=”” linktarget=”_self” animation_type=”0″ animation_direction=”down” animation_speed=”0.1″ animation_offset=”” hide_on_mobile=”no” class=”” id=””] 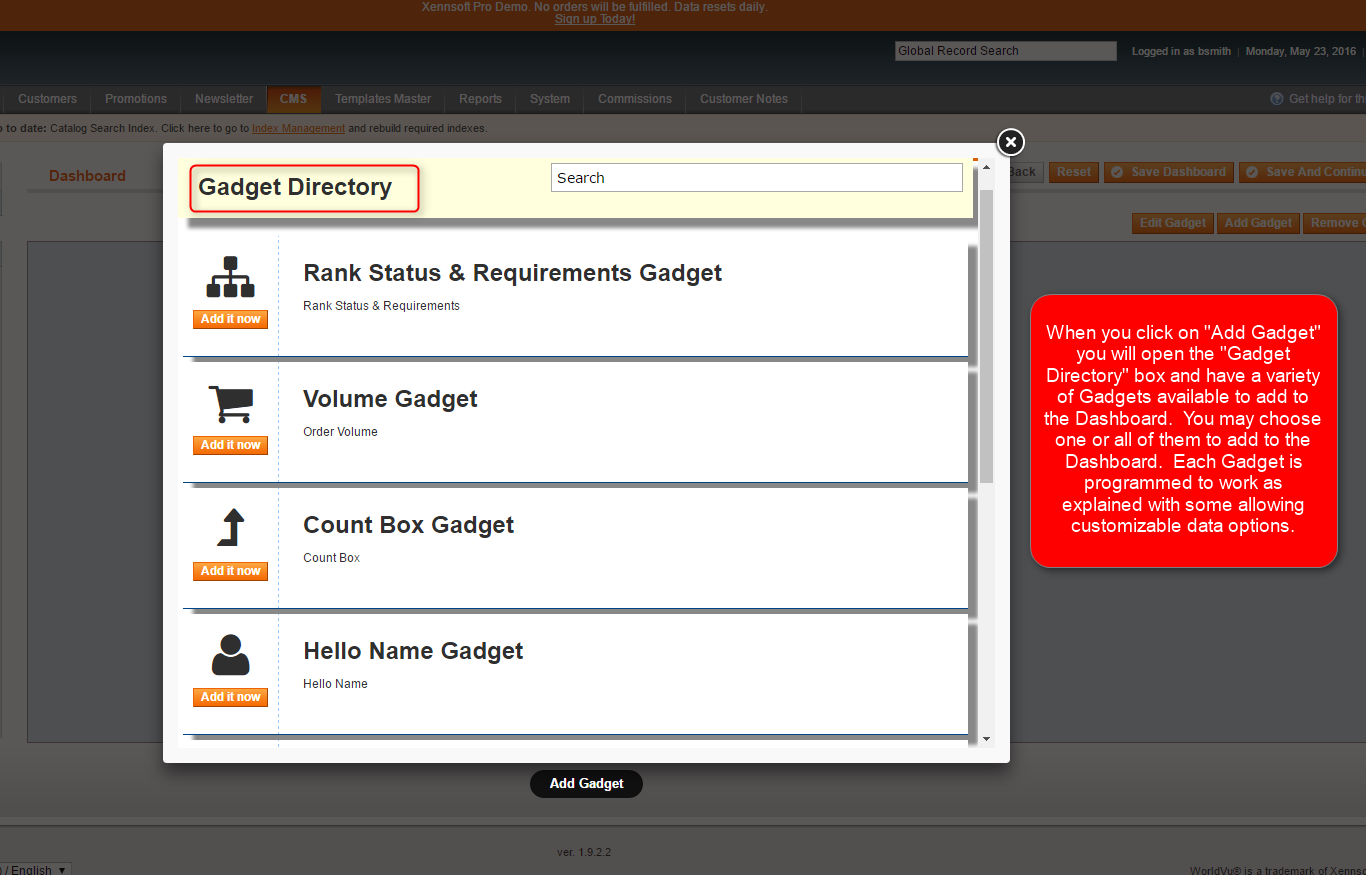 [/imageframe]
We hope this helps. Check out our other training posts for additional assistance.