Summary: This training will guide you through the processes needed to create/setup reports within the Team Office environment to be used by customers.
Log Into WorldVu Dashboard
- Click on CMS > Team Office Reports
Modifying Team Office Reports
- Click on an existing report
- Modify the report by adding, editing and/or removing information from the current report.
- When finished with the modifications, click “Save Report”
[imageframe lightbox=”no” lightbox_image=”” style_type=”none” hover_type=”none” bordercolor=”” bordersize=”0px” borderradius=”0″ stylecolor=”” align=”none” link=”” linktarget=”_self” animation_type=”0″ animation_direction=”down” animation_speed=”0.1″ animation_offset=”” hide_on_mobile=”no” class=”” id=””] 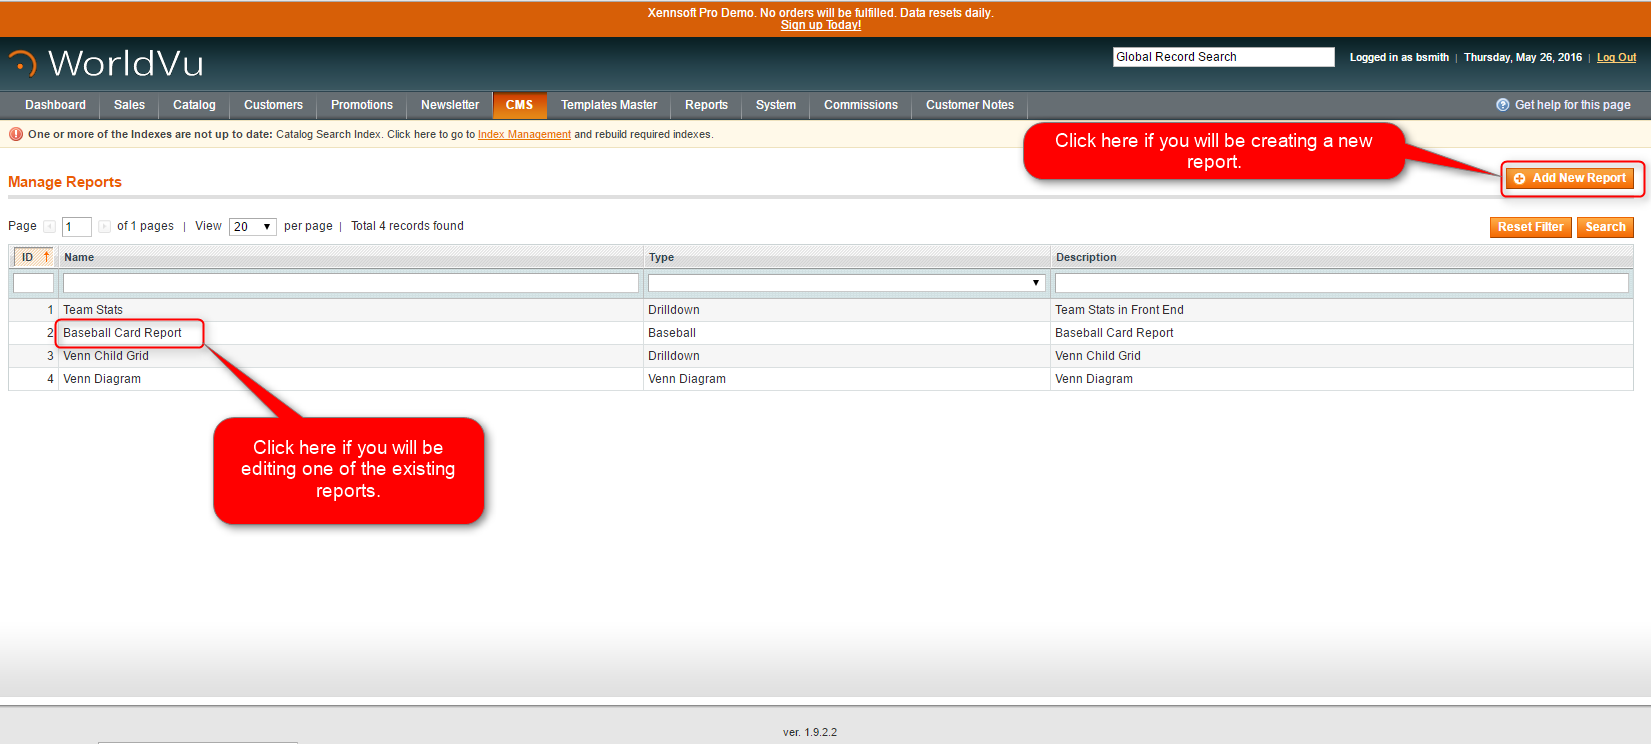 [/imageframe]
Note: There are currently (4) default reports in the system at the time this training was created. These current reports were all designed to support Associate/Distributor needs. Additional reports may be created in the future however if you need something different then please try creating a new report (if that is not possible then speak to your Xennsoft Success Coach). These reports currently apply to both retail and Associate/Distributor customers. Future reports may allow filtering by customer type but currently this feature is unavailable.
- Review your updated reports in the Team Office by logging into a customer’s Team Office and view the reports under the tab “Reports”.
[imageframe lightbox=”no” lightbox_image=”” style_type=”none” hover_type=”none” bordercolor=”” bordersize=”0px” borderradius=”0″ stylecolor=”” align=”none” link=”” linktarget=”_self” animation_type=”0″ animation_direction=”down” animation_speed=”0.1″ animation_offset=”” hide_on_mobile=”no” class=”” id=””]  [/imageframe][separator style_type=”single” top_margin=”50″ bottom_margin=”50″ sep_color=”” border_size=”” icon=”” icon_circle=”” icon_circle_color=”” width=”” alignment=”center” class=”” id=””][imageframe lightbox=”no” lightbox_image=”” style_type=”none” hover_type=”none” bordercolor=”” bordersize=”0px” borderradius=”0″ stylecolor=”” align=”none” link=”” linktarget=”_self” animation_type=”0″ animation_direction=”down” animation_speed=”0.1″ animation_offset=”” hide_on_mobile=”no” class=”” id=””]
  [/imageframe][separator style_type=”single” top_margin=”50″ bottom_margin=”50″ sep_color=”” border_size=”” icon=”” icon_circle=”” icon_circle_color=”” width=”” alignment=”center” class=”” id=””][imageframe lightbox=”no” lightbox_image=”” style_type=”none” hover_type=”none” bordercolor=”” bordersize=”0px” borderradius=”0″ stylecolor=”” align=”none” link=”” linktarget=”_self” animation_type=”0″ animation_direction=”down” animation_speed=”0.1″ animation_offset=”” hide_on_mobile=”no” class=”” id=””]
  [/imageframe]
Creating Team Office Reports
- Go to the CMS > Team Office Reports…Manage Reports page
- Click on “Add New Report”
- Provide a “Title” and “Description”
- Choose the “Report Type”
Note: Each “Report Type” produces a different type of view and experience with the report. Choose between “Baseball”, “Drilldown”, “Venn Diagram” and “Tree Report”. You will need to experiment to see which report view works best for the report you are designing. Based on the “Report Type” you choose, you may have to design a “Child Report”. Options will vary depending on the report. We will not discuss all the options in this training.
- Load the Template/Column options as directed then choose the data that will be fetched for the report.
[imageframe lightbox=”no” lightbox_image=”” style_type=”none” hover_type=”none” bordercolor=”” bordersize=”0px” borderradius=”0″ stylecolor=”” align=”none” link=”” linktarget=”_self” animation_type=”0″ animation_direction=”down” animation_speed=”0.1″ animation_offset=”” hide_on_mobile=”no” class=”” id=””]  [/imageframe][separator style_type=”single” top_margin=”50″ bottom_margin=”50″ sep_color=”” border_size=”” icon=”” icon_circle=”” icon_circle_color=”” width=”” alignment=”center” class=”” id=””][imageframe lightbox=”no” lightbox_image=”” style_type=”none” hover_type=”none” bordercolor=”” bordersize=”0px” borderradius=”0″ stylecolor=”” align=”none” link=”” linktarget=”_self” animation_type=”0″ animation_direction=”down” animation_speed=”0.1″ animation_offset=”” hide_on_mobile=”no” class=”” id=””]
  [/imageframe]
Note: If you choose a “Baseball” report type and choose to have a “Custom Template”, you will have the option to add variables into the report from an available list. Click on the “Insert Variable” to access the list.
- When you have finished designing the report, click “Save Report”
- Review your newly created report by logging into a customer’s Team Office. If you need to modify the report you can follow the modification instructions listed in this training.
[imageframe lightbox=”no” lightbox_image=”” style_type=”none” hover_type=”none” bordercolor=”” bordersize=”0px” borderradius=”0″ stylecolor=”” align=”none” link=”” linktarget=”_self” animation_type=”0″ animation_direction=”down” animation_speed=”0.1″ animation_offset=”” hide_on_mobile=”no” class=”” id=””]  [/imageframe][separator style_type=”single” top_margin=”50″ bottom_margin=”50″ sep_color=”” border_size=”” icon=”” icon_circle=”” icon_circle_color=”” width=”” alignment=”center” class=”” id=””][imageframe lightbox=”no” lightbox_image=”” style_type=”none” hover_type=”none” bordercolor=”” bordersize=”0px” borderradius=”0″ stylecolor=”” align=”none” link=”” linktarget=”_self” animation_type=”0″ animation_direction=”down” animation_speed=”0.1″ animation_offset=”” hide_on_mobile=”no” class=”” id=””]
  [/imageframe]
We hope this helps. Check out our other training posts for additional assistance.